Sunday, June 29, 2014

New MT-24EX Diffuser

Violet Darter Series 2014-1-1
Update 20 January 2016: I am not longer using this diffuser (I went back to using my own design) but they are still the best commercially available diffuser for the MT-24EX. The only negative things I can say about them is that the front plastic is a little too opaque, and that if you're using the MP-E 65mm above 4x it's difficult to get light on the subject due to the angle between the diffusers and the subject (using the Canon flash mount that comes with the flash). Good light quality "out of the box", and even better if you do a little experimenting.

For many years I struggled to get good light out of Canon's MT-24EX. The flash heads are small, there's really no built in diffuser, and in order to get good diffusion and short flash durations (to help freeze motion) the flash heads need to be as close to the subject as possible. So the trick has always been how to diffuse the MT-24EX in as short a distance as possible when it's practically a bare bulb flash. In the end I resorted to using a combination of diffusion plastics, and I turned my flash into something only Doctor Frankenstein could love.

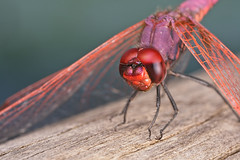
Now there's a new, commercially available, diffuser for the MT-24EX made by Mr. Ian McConnachie available via eBay. They are the best diffusers I've ever used for the MT-24EX in terms of size and diffusion quality, and on a scale of one to Martha Stuart I'd give them a nine. Really well designed! The image I'm including with this post is not an "out of the box" example since I am adding additional diffusion material inside the diffuser, but it does represent a worse case scenario for the MPE-65mm since I'm shooting at life size (the diffusers are at their maximum distance from the subject, and the apperant light size principle is working against me). Even so the diffusion is really good! The specular highlight on the right edge of the dragonfly's eye is normal, and simply due to the angle between the flash head and the subject. You'll notice that there is color and texture behind that specular highlight -it's not completely blown out and that's what you want. At higher magnifications the flash heads get even closer to the subject and the diffusion gets even better.

As an extra added bonus the modeling lights on the MT-24EX are still usable, although the light output is a little reduced because it has to pass through the diffuser. It hasn't been a big deal for me since my own diffuser designs for the MT-24EX have worked in the same way so I'm use to it.

Here's an instruction video by Mr McConnachie showing how to assemble and attach the diffuser:


Disclaimer: I have received no financial compensation for this blog post, not now nor in the future. I'm providing this information solely because I know that there are people out there who are still struggling to get good light out of the MT-24EX... Update: After I ordered a second set of Ian's diffuser (wanted a set to experiment with) he refunded my money. He didn't have to, and I didn't ask. I like his diffuser so much that I was willing to purchase two sets out of my own pocket. I did, however, pay full price for the set that I reviewed for this post.

Saturday, June 14, 2014

Tiny Bees Series 1-1 Deconstruction


Tiny Bees Series 1-1
Originally uploaded by Dalantech


I woke up early, not long after the sun had come up, hoping to find something to photograph. The nighttime temperatures were still pretty low, something that both works for and against me: If I could find a bee then it would probably be pretty lethargic and I could get close. But since the weather was still cool most of the bees are still sleeping underground, and the species that do not sleep in tunnels aren’t out yet.

The bee included with this post is a very small species, not more than a few millimeters long. This one had either gone to sleep on a flower (males will sleep in the areas that they are patrolling for mates), or its metabolism had dropped for some reason and it couldn’t find shelter underground. At night the flower closed, trapping the bee inside. When I first spotted it there was just a little head sticking out of the top of that flower and I was hoping to get a much different composition than the one pictured. But when I grabbed the flower’s stem to steady it the bee crawled the rest of the way out. Not to be deterred I spotted a rose nearby that I could use for the background and a few other compositions started popping into my head. I never use a tripod or focusing rail, preferring to shoot hand held because it’s a lot faster than messing with the dials on a focusing rail (once I built up the muscle memory for it). While holding onto the stem of the flower with my left hand I rest the lens on that same hand so that both subject and camera are on the same “platform”. I set the focus my sliding the lens on my hand, and I can make adjustments to the angle of the subject just by rotating the stem between my thumb and index finger. Sounds tricky and it is, but once you get used to it it’s actually an easy way to shoot macro at high magnification.

I chose a low angle because I like shooting insects in much the same way that a portrait photographer photographs a model. You wouldn’t take a shot of the top of someone’s head, and taking a shot with an “I’m about to step on it” perspective is really boring. I focused on the bee’s mandible, and then “rolled” the camera slightly toward the top right corner of the frame so that the area of acceptable focus would cover as much of the bee’s face as possible. I’m not a detail junky, so taking a single frame at five times life size and F11 gives me a good balance between depth of field and detail.

Backgrounds are important in any image, and when dealing with flash falloff it’s really important to have something close behind the subject to reflect light back into the camera. Fortunately the flower the bee was on was close to a dark pink rose and I was able to use it to keep the background from being black. Also notice that the background color isn’t even. Here again I’m borrowing a compositional concept from another photographic discipline, but this time it’s landscape photography. When shooting a landscape you really want partly cloudy skies. A clear sky will make the scene look flat because the background color will be even, and clouds add a lot of depth because they break up that background. Likewise here since I’ve positioned the bee in front of an area where the color isn’t even the image has a lot more depth –it looks more three dimensional. Of course the way that I’m positioning the flash heads, one used as a key and the other as a fill, also helps because the light on the subject isn’t dead even.

Footnote: Why did I go into such detail on this particular deconstruction? Because I’m getting too many emails and private messages from people who have seen my work, went out and bought the same gear, and they are getting frustrated because they can’t get the same results. Having enough disposable income for a high end DSLR, macro lens, and dedicated macro flash is not an “I win button”. There’s so much more to a good photo than just the equipment that was used to take it it’s not even remotely funny. Macro is probably one of the most demanding photographic disciplines and if you don’t have a lot of patience or you’re not willing to take the time to learn how to photograph the small world then you need to consider doing something else. Walking on a tight rope looks easy until you’re the one putting your feet on the rope…

Flickr

This is a test post from flickr, a fancy photo sharing thing.