Wednesday, December 31, 2014

Turn Down for What?!

Every year it's the same story; I think that "this is going to be the year" -it's gonna be better than the last and I'm going to shoot more. But every year the song remains the same and real life gets in the way of what's really just a hobby. Network engineering pays the rent and being the "gatekeeper to the small world" is charity work ;)

This year started off just like any other in that I was optimistic and passionate only to get curb stomped by the day job. Mason bees emerge in the early spring, during the first warming trend after the cold weather has passed. I really like photographing the little critters and this year I completely missed them. One of the first images that I posted this year was a Red Velvet Mite that I found on a flower growing in my back yard -it's all I had time to look for...


By the middle of the year I was getting pretty frustrated. I'm very passionate about macro photography and I'm just not ready to put the kit down and walk away. But at the same time I was feeling the need to do more -if my time with the camera was going to be limited then I wanted to make the most of it and get some of the compositions that had been stuck in my head into the machine. Not content with photographing a lethargic solitary bee, and adding yet one more still life shot to a gallery that's already stuffed with them, I put some honey on a sunflower leaf and shot this critter when it woke up and started feeding:


Likewise I could have shot this honeybee while it was feeding inside of a zucchini flower, but I've been there and done that. So instead I waited until it had stopped to clean some of the pollen off of itself and baited it into feeding on my finger:


So here I am getting ready for the new year and wanting to continue pushing myself to take images that are not only different than the norm, but to dial up the difficulty and really challenge myself. To shoot more outside of my comfort zone and continue to be passionate about one of the toughest photographic disciplines. I even set up a house for the Mason bees hoping that they nest in my yard.

Turn down for what?!...

Wednesday, November 12, 2014

Before and After

I'm in this constant loop of self improvement that usually involves things that fall into one of three categories: Lighting, Composition, and Post Processing. That last one has been my Achilles Heel because Ive spent the majority of my time on the first two. But now that I pretty much have my lighting sorted out I'm spending more time on my post processing "skills" -in quotes cause I still suck at it. But I am getting better, and recently I was reminded of an image that National Geographic published in their Young Explorer Magazine (Jan/Feb 2011 pages 10 and 11) and I wanted to see what I could do to improve the shot. At that time I was wrestling with a flower that was yellow but always seemed to come out a little on the orange side, or with a greenish tint. Here's the original edit:


Here's my recent pass on the original RAW file:


The yellows are a lot better, and the overall contrast is much improved. For post processing I'm currently using Photoshop Elements 13 with Topaz plugins (Denoise, Detail, Clarity, and Adjust depending on the image). I'm not going to get into a play by play on my post processing because I'm still learning, but if you are looking to improve your digital darkroom skills then check out the Topaz YouTube Channel -even if you don't use their plugins there's still a lot of really good advice!

If anyone has some other online post processing references then please pass them my way in the comments.

Tuesday, November 11, 2014

Studio Verses Field Macro

I frequently see photographers debating the merits of "natural" photography, and these days I have a tendency to avoid such discussions like the plaque. The word natural is just too subjective -what might seems perfectly natural to you might be completely unnatural to me (or vise versa). Truth be told I do not think that macro photography is natural since most people can't see more detail than what's visible in a 1/3 life size image. So I have no interest, romantic or philosophical, in creating natural images. My goal is to make images that people want to print large and hang on the wall, even though it's a photo of a "bug". To that end I'd rather be shooting in near studio conditions so that I have full creative control over the scene, and so I can show you what I want you to see and not just what the camera was able to capture. There's just no way to produce an image like this one in the field:


I was photographing that solitary bee on my patio table, but initially it wasn't active. I'm getting bored with taking static images because the story telling aspect is, well, short. "Here is a sleeping insect. The end". Kinda dull, and I really don't want the images in my gallery to get repetitive. So I was sitting there thinking about the scene that I wanted to shoot when it dawned on me that I could probably create it. If I failed then I'd still have a static shot of a sleeping bee, but if it worked I'd not only have a much better image I'd also be able to get a composition out of my head that had been stuck there for a few years. So I put some honey on a sunflower petal, coaxed the bee to climb onto it, and when it started feeding I shot it like it was the last image I was ever going to take. For the background I used a piece of light blue plexiglass with some glossy photo paper taped behind it. Is it "natural"? Not even close. Is it a photo that looks good printed large? Well let's just say that I had a print of it on canvas gallery wrapped that's currently hanging at my mother in law's house...

Given the choice I'd much rather shoot in near studio conditions, but that doesn't stop me from chasing the critters in the heat of the day when they are hyper active. The down side is that I'm not in full control of the scene so I pretty much have to accept what the critter and the lighting conditions will give me. Sometimes I get lucky and I can use the flash to expose for the subject and let the natural light expose the background, like in this image:


I'm still holding on to the flower's stem to help keep the scene steady, but other than that I'm not manipulating the frame or the subject. Contrast that shot with this one where I'm sitting at the patio table, I have my "studio" set up, and I've baited the subject:


I'm not saying that either style is right or wrong, but given the choice I'd much rather produce studio images.

Saturday, October 18, 2014

27 Frames

Feeding Bumblebee on a Sunflower III
Sometimes I think that when I post an image deconstruction I'm projecting the impression that it's really easy -as if images just jump right into the camera. But it's not and you can't just go out, buy the same hardware, and take the same photos -not without getting a lot of practice first. I've lost count of the number of emails that I've received from people who are struggling with macro photography, people who thought that the key to taking macro photos was simply having enough disposable income to afford the gear. So with this image I want to talk about what I was trying to do and how difficult it was.

I was asked if I focus stacked this image, but like all of my insect macro photography it is a single frame taken hand held (no tripod, I don't even own one). Although it would have been easier to get the shot that I wanted if I could focus stack a scene like that one, it would have been pretty tough since the critter was in constant motion. What really made this one difficult is that antenna -it needs to be in focus since it's crossing the bee's eye, and that appendage was always moving. To add insult to injury I'd no sooner frame and compose the image and the bee would move as I was pressing the shutter release. So I'd have to recompose, check the framing with my peripheral vision, look at the area that I wanted to be in focus and make sure that I could clearly see texture detail where I needed to see it, and hope that the position and focus on the antenna didn't ruin the shot.

It took 27 frames...

Wednesday, October 15, 2014

Extreme Macro

Recently the extrememacro.com domain became available and I took the winning bid. Although the url for this blog will have to stay as nocroppingzone.blodspot.com (someone is using extrememacro.blogspot.com) I've changed the title of the blog and I set up a DNS redirect so that if you surf to www.extrememacro.com you'll get this blog.

Nice to have a name that's really more in line with what this blog is about, and that lines up with the title of my book. Speaking of which one of the projects that I have on my to do list for this winter is to come out with a second edition :)

Friday, October 3, 2014

Out with the Old Style and in with the New

Solitary Bee Portrait
I was chimping through the images on my camera, looking at the photo to the right, and thinking "meh". Technically there's nothing wrong with that shot but I've taken it already, or at least images like it, and I'm getting tired of shooting the same frames -and you're probably getting tired of looking at them. For me really good images come from being inspired, and passionate, about what I'm photographing and how I'm photographing it and that scene just wasn't "singing to me". To add insult to injury it wasn't the shot that I wanted. I had a composition stuck in my head for a few years, one of a solitary bee actively feeding and shooting it low enough to get the proboscis in focus as well as the head. So as I was sitting there at my patio table, looking at the carnage that once was a sunflower (petals everywhere) with a solitary bee that was getting more and more active, when it hit me: Why not put some honey on a sunflower petal, get the critter to climb onto it, and with the sunflower petal in my hand I could get the angle that I wanted...

Feeding Solitary Bee Series 1-1


Feeding Solitary Bee Series 1-4


Feeding Solitary Bee Series 1-3


One more composition out of my head and into the camera, and it's a scene that I feel good about. I'm not saying that I won't take any more "static" images like the first one, but you can expect to see a lot more "action" shots from me in the future. Out with the old style, and in with the new :)

Sunday, September 7, 2014

Exposing for Two Light Sources

The last time I was out at my Mother in law's farm something strange happened. It was late in the evening and I found a bumblebee foraging on a sunflower and it didn't care how close I was getting. As long as I kept my movements slow I could get as close as I wanted, and even managed to grab onto the stem of the sunflower and rotate it a little several times. I probably stood there for a good twenty minutes shooting the critter, taking an occasional break to give my arms a rest (the joys of hand holding about 2.5 kilos in camera gear straight out in front of my body). While photographing the bee my flash batteries started to die, and I accidentally took a few frames without the flash. While chimping through the images on my camera's LCD later I started to delete them and then I realized I could turn the whole situation into a happy accident and explain a few things about mixing light sources. I was attempting to drag the shutter -use a slow shutter speed (in this case 1/30) to expose for the natural light behind the subject, and then use the flash to not only expose for the subject itself but to freeze any motion that might be in the scene. The slow shutter speed shouldn't make any difference with respect to the subject because there just wouldn't be enough natural light to expose it, and I don't care about movement in the background while the shutter is open since it's going to be out of focus anyway. Works really well if the background is well lit and the subject is in heavy shadow. But I was shooting in the late evening and had to be careful because the background light levels were low -exposing for the background would put me dangerously close to exposing for the subject, as you can see in the frame below when the flash didn't fire.

Image One


To me there are three things that stand out in that image. There is a specular highlight caused by the sun in the bee's eye. That specular highlight is going to be additive with the one that the flash will create, possibly reducing the detail in that area of the eye. I can also see the color in the bee's "fur" and the sunflower's petals so both those area could be subject to ghosting if there is any movement, and it usually ends up looking like an odd shadow or blur of colors in those areas that are being exposed by the natural light. Fortunately for me the bee wasn't moving, I had the flower's stem in my left hand and the lens resting on that same hand, and I press the shutter on my camera like I'm squeezing the trigger on a gun. Here is the resulting frame with the flash.

Image Two


I like the angle that I have on the bumblebee and the way it seems to be posing for me, but I don't like the foreground (too distracting). Since the natural light was failing I eventually went to twice life size, brought the shutter to 1/250 to cut out all of the natural light, and just let the background go black due to flash falloff (nothing in the background to reflect the light from the flash back into the camera so it simply becomes black). I could have done the same thing when I was shooting the life size scene above, but if there is a lot of space around the subject I want to see some color in it other than black (and based on feedback so do you). Here's the resulting 2x frame.

Bumblebee on a Sunflower II


Exposing for two light sources sounds tricky, and it can be. Keep in mind that the natural light exposure is going to be effected by changes in ISO, shutter speed, and Fstop. Flash exposure is effected by ISO and Fstop but not the shutter speed as long as the speed of the shutter is not faster than the flash sync speed. When using the flash to freeze motion you want to avoid using high speed sync (HSS) since it pulses the flash to take multiple exposures while the shutter is open and any movement while the flash is pulsing will be recorded.

By now it should be obvious why I've been experimenting with materials to reflect the flash back into the camera so I can cut out the natural light in a scene and just use the flash as a single light source. Like my "blue sky" -a piece of light blue plexiglass with a sheet of glossy photo paper behind it.

Feeding Bumblebee on a Sunflower


Or a nearby grape leaf and a honeybee that's cooperative enough to let me move her in front of it for a shot.

Pollinators Series 3-1


Until next time happy shooting folks :)

Monday, September 1, 2014

Daily Deviation Number Seven

Swapping Spit
I just received my seventh Daily Deviation at Deviant Art for this image.

Thanks to all of my followers at Deviant Art -you folks are the greatest!

Tuesday, August 12, 2014

Accept No Limits

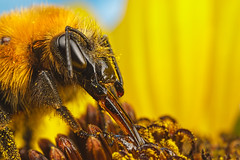
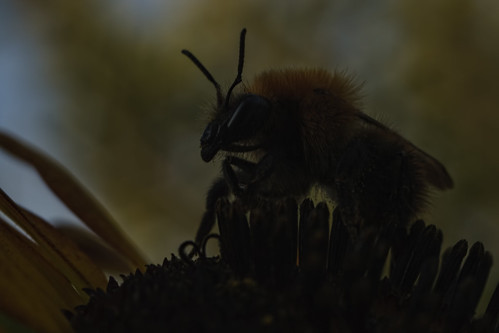
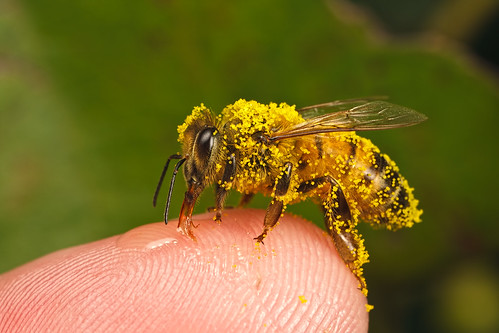
The mosquitoes had turned my legs into an all you can eat buffet. Looking at the little red dots that marked the end of their existence on this plane I wondered if I was creating a super race. Maybe, just maybe, I was only killing the slow and stupid ones so that the fast and smart would reproduce. While I was still contemplating my role in natural selection I noticed a honeybee covered in Zucchini pollen. She landed in a flower that was very low to the ground and the angle would make for a really difficult shot. I’ve photographed honeybees covered in pollen before but it was was several years ago. My lighting and skills have improved a lot since those early images, but shooting her in that flower was going be tough. The petals act like a yellow bounce card making the light very warm, and then there’s the background to worry about. If I shot her at the edge of one of those petals to get a break on the light then there’s a good chance that the background would be black. Given the choice between a shot with a dark background, or no image at all, I can go quite a while before posting a photo to my gallery. The average macro photographer will accept a black background due to flash falloff but John Q. Public (someone who knows nothing about macro and the difficulty of shooting the small world) will not and he’s my target audience. There had to be a way…

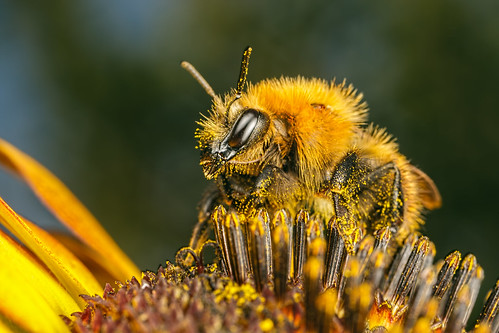
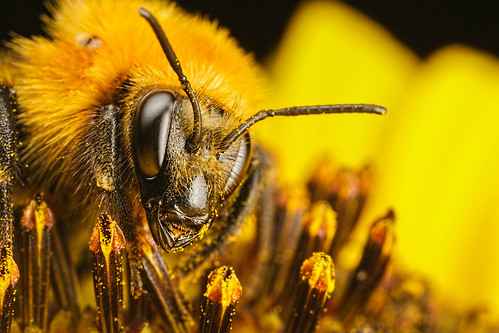
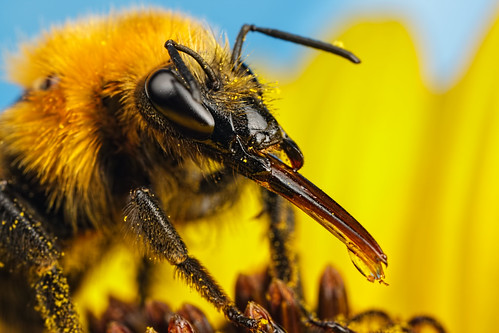
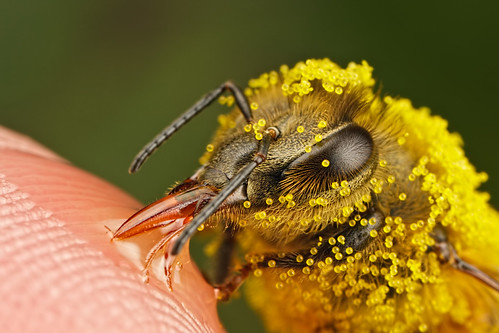
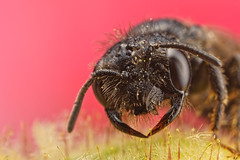
Watching her feed I realized that she was looking for nectar, and just happened to be covered in pollen. Honeybees generate static electricity with their wings, and that static charge builds up in their hair and attracts pollen. Since she was looking for the sweet stuff she just might take some bait because honeybees are also very task oriented –if they are looking for pollen then they won’t take the sweet stuff. But she was definitely going for the nectar at the very bottom of the Zucchini flower. So when she came up to the top of the flower to do some pre-flight maintenance (there was so much pollen stuck to the hairs in her eyes she probably couldn’t see) I put some honey on the end of my finger and put it in front of her. She not only climbed onto my finger to feed on it, she let me stand up so I could position her in front of a grape leaf to keep the background from going black. Sometimes the flash would bother her and she’d fly off, and sometimes she’d just finish the honey and would move on. But each time she’d land less than a meter from me to try to get more of the pollen off, and each time I’d offer her a baited finger and go back to shooting.

There was so much pollen on her that, even from a distance, I could see it falling like snow.

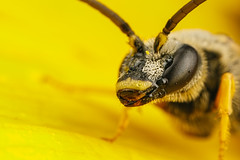
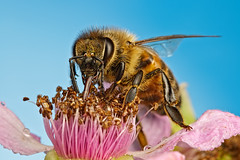
I took a range of compositions and magnifications. I knew that it might be quite some time before I had an opportunity to shoot a cooperative pollen covered honeybee under almost controlled conditions so I wanted to make the most of it. One of the things that has me spoiled about shooting with the Canon MP-E 65mm is that I know what magnification I have to be at to get the framing that I want. Being able to simply dial in the mag without having to add or subtract extension tubes from a normal macro lens means that my EF-S 60mm doesn’t get as much time on the camera even though I can take it to almost 3x with a full set of tubes. I only edited three of the frames, saving the rest for this winter when there’s nothing moving and I want to post an image to my gallery. Below are the two that I like the most. As always they're single, un-cropped, frames taken hand held. I am the "finger model".

Pollinators Series 3-3


Pollinators Series 3-2


Someone asked me “How did you even think to do this?!” My mentor, Professor Mark Plonsky, got me to think outside the box and to accept no limits when shooting the small world. I remember showing Mark 
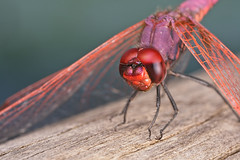
a photo of a dragonfly that I was really proud of. He said something like “That’s nice, but you could have gotten closer”. At first I was kinda upset, but the more I looked at the image the more I realized that he was right. I could have gotten closer but I didn’t because I thought the critter wouldn’t let me. I failed not because the subject didn’t cooperate –I simply assumed that it wouldn’t…

Footnotes: Looking at those old honeybee shots I know that I could go back and re-edit some of them because my post processing has also improved. Added to my “to do” list…

Some of you are gonna want to over react to my using honey to bait honeybees. First it was probably their honey, since there is a hive less than 100 meters from where I was shooting and I bought the honey from the beekeeper that “owns” the hives (owns is in quotes cause we all know that women rule the world and the girls are just letting him think that their home is his). Also most beekeepers have told me, due to the small quantities that I use, that even if there’s something bad in the honey a healthy hive will not be affected. So relax.

Last, but not least, be VERY careful when shooting anything that can sting you. You could be allergic, and even if you’ve been stung in the past you could still have an allergic reaction to the venom. Do not shoot alone…

Friday, August 1, 2014

It's All About the Background

Honeybee Feeding on a Blackberry Flower
For quite a while now I've gone out of my way not to get a black background in my photos -everything from holding the subject in front of grape leaves to fence posts. But one of the things that I've wanted to do for a long time is simulate a blue sky. So I bought a piece of light blue plexiglass and experimented with putting different materials behind it to reflect the light from the flash back to the camera, but nothing seemed to work. One day while driving home I was looking at a blue sky that was being diffused by some very thin clouds and it dawned on me that what I really needed was something that was going to diffuse the light before it passed back through the plexi. Something like a white card, but what did I have at home that acted like a white card? Then a little voice in the back of my head said:

"What about all that photo paper that you don't use, you idiot. You know, the stuff you have laying around from ink jet printer kits that you had to buy when the store ran out of individual ink cartridges."

The voice was right -suddenly I was getting that light shade of blue that I wanted to see in my backgrounds and all I had to do was gaffer tape a piece of photo paper to the back of the plexiglass, glossy side to the camera. If you try this trick yourself be advised that if you get the subject too close to the plexi that there will be a visible halo around the critter that's gonna be impossible to remove in post. I try to keep the subject at the same distance from the background that it is from the lens (maybe a little more).

Here's a short video of me using the plexiglass in the field to shoot the image included with this post. Pretty basic stuff really, but the results are pretty nice.

Thursday, July 10, 2014

My Book is now available at Amazon

II now have an author's page at Amazon. Even though "Extreme Macro, the Art of Patience" is four years old now it's still relevant and has a lot of useful information. You can even get an eBook version via Blurb.

Sunday, June 29, 2014

New MT-24EX Diffuser

Violet Darter Series 2014-1-1
Update 20 January 2016: I am not longer using this diffuser (I went back to using my own design) but they are still the best commercially available diffuser for the MT-24EX. The only negative things I can say about them is that the front plastic is a little too opaque, and that if you're using the MP-E 65mm above 4x it's difficult to get light on the subject due to the angle between the diffusers and the subject (using the Canon flash mount that comes with the flash). Good light quality "out of the box", and even better if you do a little experimenting.

For many years I struggled to get good light out of Canon's MT-24EX. The flash heads are small, there's really no built in diffuser, and in order to get good diffusion and short flash durations (to help freeze motion) the flash heads need to be as close to the subject as possible. So the trick has always been how to diffuse the MT-24EX in as short a distance as possible when it's practically a bare bulb flash. In the end I resorted to using a combination of diffusion plastics, and I turned my flash into something only Doctor Frankenstein could love.

Now there's a new, commercially available, diffuser for the MT-24EX made by Mr. Ian McConnachie available via eBay. They are the best diffusers I've ever used for the MT-24EX in terms of size and diffusion quality, and on a scale of one to Martha Stuart I'd give them a nine. Really well designed! The image I'm including with this post is not an "out of the box" example since I am adding additional diffusion material inside the diffuser, but it does represent a worse case scenario for the MPE-65mm since I'm shooting at life size (the diffusers are at their maximum distance from the subject, and the apperant light size principle is working against me). Even so the diffusion is really good! The specular highlight on the right edge of the dragonfly's eye is normal, and simply due to the angle between the flash head and the subject. You'll notice that there is color and texture behind that specular highlight -it's not completely blown out and that's what you want. At higher magnifications the flash heads get even closer to the subject and the diffusion gets even better.

As an extra added bonus the modeling lights on the MT-24EX are still usable, although the light output is a little reduced because it has to pass through the diffuser. It hasn't been a big deal for me since my own diffuser designs for the MT-24EX have worked in the same way so I'm use to it.

Here's an instruction video by Mr McConnachie showing how to assemble and attach the diffuser:


Disclaimer: I have received no financial compensation for this blog post, not now nor in the future. I'm providing this information solely because I know that there are people out there who are still struggling to get good light out of the MT-24EX... Update: After I ordered a second set of Ian's diffuser (wanted a set to experiment with) he refunded my money. He didn't have to, and I didn't ask. I like his diffuser so much that I was willing to purchase two sets out of my own pocket. I did, however, pay full price for the set that I reviewed for this post.

Saturday, June 14, 2014

Tiny Bees Series 1-1 Deconstruction


Tiny Bees Series 1-1
Originally uploaded by Dalantech


I woke up early, not long after the sun had come up, hoping to find something to photograph. The nighttime temperatures were still pretty low, something that both works for and against me: If I could find a bee then it would probably be pretty lethargic and I could get close. But since the weather was still cool most of the bees are still sleeping underground, and the species that do not sleep in tunnels aren’t out yet.

The bee included with this post is a very small species, not more than a few millimeters long. This one had either gone to sleep on a flower (males will sleep in the areas that they are patrolling for mates), or its metabolism had dropped for some reason and it couldn’t find shelter underground. At night the flower closed, trapping the bee inside. When I first spotted it there was just a little head sticking out of the top of that flower and I was hoping to get a much different composition than the one pictured. But when I grabbed the flower’s stem to steady it the bee crawled the rest of the way out. Not to be deterred I spotted a rose nearby that I could use for the background and a few other compositions started popping into my head. I never use a tripod or focusing rail, preferring to shoot hand held because it’s a lot faster than messing with the dials on a focusing rail (once I built up the muscle memory for it). While holding onto the stem of the flower with my left hand I rest the lens on that same hand so that both subject and camera are on the same “platform”. I set the focus my sliding the lens on my hand, and I can make adjustments to the angle of the subject just by rotating the stem between my thumb and index finger. Sounds tricky and it is, but once you get used to it it’s actually an easy way to shoot macro at high magnification.

I chose a low angle because I like shooting insects in much the same way that a portrait photographer photographs a model. You wouldn’t take a shot of the top of someone’s head, and taking a shot with an “I’m about to step on it” perspective is really boring. I focused on the bee’s mandible, and then “rolled” the camera slightly toward the top right corner of the frame so that the area of acceptable focus would cover as much of the bee’s face as possible. I’m not a detail junky, so taking a single frame at five times life size and F11 gives me a good balance between depth of field and detail.

Backgrounds are important in any image, and when dealing with flash falloff it’s really important to have something close behind the subject to reflect light back into the camera. Fortunately the flower the bee was on was close to a dark pink rose and I was able to use it to keep the background from being black. Also notice that the background color isn’t even. Here again I’m borrowing a compositional concept from another photographic discipline, but this time it’s landscape photography. When shooting a landscape you really want partly cloudy skies. A clear sky will make the scene look flat because the background color will be even, and clouds add a lot of depth because they break up that background. Likewise here since I’ve positioned the bee in front of an area where the color isn’t even the image has a lot more depth –it looks more three dimensional. Of course the way that I’m positioning the flash heads, one used as a key and the other as a fill, also helps because the light on the subject isn’t dead even.

Footnote: Why did I go into such detail on this particular deconstruction? Because I’m getting too many emails and private messages from people who have seen my work, went out and bought the same gear, and they are getting frustrated because they can’t get the same results. Having enough disposable income for a high end DSLR, macro lens, and dedicated macro flash is not an “I win button”. There’s so much more to a good photo than just the equipment that was used to take it it’s not even remotely funny. Macro is probably one of the most demanding photographic disciplines and if you don’t have a lot of patience or you’re not willing to take the time to learn how to photograph the small world then you need to consider doing something else. Walking on a tight rope looks easy until you’re the one putting your feet on the rope…

Flickr

This is a test post from flickr, a fancy photo sharing thing.

Sunday, February 23, 2014

Reversing the Publishing Scam

Back in December of 2009 I wrote about the Photography 401 Scam and how publishers try to get you to give up your photos for free. A pro photographer in Boston came up with an interesting twist in this Craigslist add:

"I am looking to hire all types of people to do all sorts of jobs for me, as long as I do not have to pay anything. Just think, you will gain more experience, and I will put the word out for you and let everyone know what wonderful work you do. This opportunity will bring you a ton of unpaid work, but everyone will love you. So if you have a job or service you provide, and will do it for free, please let me know, because I am sure I have work for you and will hire you in a second."

Why not -everyone expects him to give his work away! :)

A publisher telling you that they don't have a budget for images makes as much sense as a restaurant that doesn't have a budget for food, so stop giving your photos away for nothing more than a photo credit...