Here's a collection of some of my favorite images from 2008.

Monday, December 29, 2008
Saturday, December 27, 2008
Macro Resolutions for 2009
It’s that time of year again –time to take a subjective look at my photos and decide where I need to improve, and the direction I want to take my work in the New Year.
Composition is King: I need to continue to work on my compositional skills, and along with that my lighting since the light is a compositional tool. I made a lot of progress in 2008, but I need to keep pushing myself on this one…
Get Better at Post Processing: I’m already working on this one since my poor post processing “skills” need a lot of improvement. There’s just no sense in spending a lot of time and effort on all the things that I need to do before I press the shutter release only to shoot myself in the foot during post…
Let Conditions Dictate How I Shoot: If there is very little wind and the natural light is good then shoot close-ups. If the natural light is poor but the wind is calm then shoot at life size and use the flash as the primary light source. Last if it’s windy then shoot at 2x and higher since it’s easier to grab onto the flower a critter is feeding on when there is a breeze –they can’t tell the difference between the wind and me touching the flower and once I grab onto the stem the wind becomes a non issue. Continue to work on my technique…
Use Magnification as a Compositional Tool: I started to do this one, but kinda fell out of it. There are some magnifications that just don’t work for some subjects –like shooting a dragonfly at life size. There’s no way I can get the entire critter into the frame, and once I start clipping the wings and the tail I might as well go up to 2x or 3x and just take a portrait. I really need to get out of the habit of shooting on even magnifications –another thing that I started to do and fell out of…
Practice Until it Hurts: Then practice some more…
Friday, December 26, 2008
Portfolio Series 2008 Part 6
Sixth and final set of macro images:
Mantis Maintenance by =dalantech on deviantART
Bee Portrait IV by =dalantech on deviantART
Drone Hoverfy at 3x by =dalantech on deviantART
Blowing Bubbles II by =dalantech on deviantART
Om Nom Nom IV by =dalantech on deviantART
Now it's time to get ready for 2009 :)
Mantis Maintenance by =dalantech on deviantART
Bee Portrait IV by =dalantech on deviantART
Drone Hoverfy at 3x by =dalantech on deviantART
Blowing Bubbles II by =dalantech on deviantART
Om Nom Nom IV by =dalantech on deviantART
Now it's time to get ready for 2009 :)
Portfolio Series 2008 Part 5
Fifth set:
Miner Bee at 5x by =dalantech on deviantART
Wild Honeybee III by =dalantech on deviantART
Everything is Hairy by =dalantech on deviantART
Guard Dog by =dalantech on deviantART
Hungry Hoverfly I by =dalantech on deviantART
Miner Bee at 5x by =dalantech on deviantART
Wild Honeybee III by =dalantech on deviantART
Everything is Hairy by =dalantech on deviantART
Guard Dog by =dalantech on deviantART
Hungry Hoverfly I by =dalantech on deviantART
Portfolio Series 2008 Part 3
Third set:
Room with a View II by =dalantech on deviantART
Room with a View by =dalantech on deviantART
Dog Pile by =dalantech on deviantART
Wevil at 1.5x by =dalantech on deviantART
After the Rain by =dalantech on deviantART
Room with a View II by =dalantech on deviantART
Room with a View by =dalantech on deviantART
Dog Pile by =dalantech on deviantART
Wevil at 1.5x by =dalantech on deviantART
After the Rain by =dalantech on deviantART
Saturday, December 20, 2008
Portfolio Series 2008 Part 2
Here's the second set:
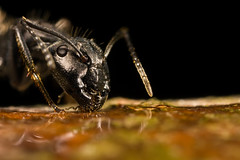
Ant at 3x by =dalantech on deviantART
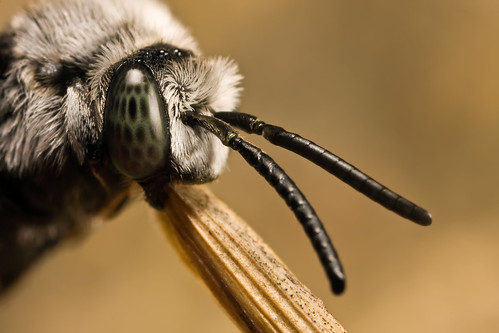
Miner Bee Profile by =dalantech on deviantART
It's My Flower by =dalantech on deviantART
September Dragon XIII by =dalantech on deviantART
Finger Licking Good V by =dalantech on deviantART
Ant at 3x by =dalantech on deviantART
Miner Bee Profile by =dalantech on deviantART
It's My Flower by =dalantech on deviantART
September Dragon XIII by =dalantech on deviantART
Finger Licking Good V by =dalantech on deviantART
Thursday, December 18, 2008
Portfolio Series 2008 Part 1
I'm going through my portfolio and re-editing my best images of 2008. Here is the first set -more to come. If you click on a photo you'll get my page at Deviant Art that has the image, and if you click on the image on that page you can see a 1280 pixel wide version of the shot.
Scraping out the Pollen by =dalantech on deviantART
Hungry Hoverfly VI by =dalantech on deviantART
Sleeping Solitary II by =dalantech on deviantART
Dragon in Flight by =dalantech on deviantART
Honeybee on Sunflower I by =dalantech on deviantART
Scraping out the Pollen by =dalantech on deviantART
Hungry Hoverfly VI by =dalantech on deviantART
Sleeping Solitary II by =dalantech on deviantART
Dragon in Flight by =dalantech on deviantART
Honeybee on Sunflower I by =dalantech on deviantART
Monday, December 15, 2008
Living Pixels Temporarily Down
From Allan Melsen, site owner & administrator of livingpixels.org:
"As many of you have noticed, Living Pixels (www.livingpixels.org) has been down for some days now.
Followed by a series of accidents; modifications screwing up the database and configuration was the first problem. During this, I fiddled back and forth and couldn't make it work...
So I decided to just delete the setup and restore a backup from the day before... Easier said than done. I accessed the control panel at the hosting center and clicked restore... chose the newest restore which was only 1 day old... after waiting 45 minutes, my data still wasn't back - so I opened a support case with the hosting center...
I asked in the mail how long this normally takes because I had waited for 45 minutes and still couldn't see my data having been restored, and got the following reply:
------------------------------------------------------
"Generally, this should not take long at all. I gave it a bit more time,
just in case it had a lot of data to restore. When I noticed nothing had
been restored two hours later, I went ahead and had an admin look further
into it for you. It looks like the problem is that, unfortunately, there
aren't any backups to restore it to."
"I'm very sorry about that! Although we don't guarantee backups, we do try
to provide them, and we are looking into why the backups weren't
performed in the first place. Your best bet, at this point, is to just
re-upload the files."
"Again, I apologize for the problems this caused you."
-----------------------------------------------------
So basically, this means everything from the last month and a half is GONE.
So, therefor I quit the hosting company and are getting a refund from the money I spend with them... Not that thats a comfort.
To make things even worse, I've had to put my beloved dog of 4 years to sleep after he tore a ligament on his right hind leg. Our family has been in deep sorrow after losing this family member, and those of you who have a dog will know how attached you can get to them. This also put a bit of strain on my motivation and desire to work on this error...
Things are looking brighter now though... and I'm now working on finalizing a new server setup, and hope to have the site up and running early january...
I'm terribly sorry about all this fuss... hopefully Living Pixels will be back in an even stronger form than before... "
Sunday, December 14, 2008
Ignore the man behind the cutain...
This blog has been in dire need of an overhaul for far too long, and I'm finally getting around to using a random header image so that when you come to the site, click on a link, or refresh the page the logo at the top changes.
Saturday, December 13, 2008
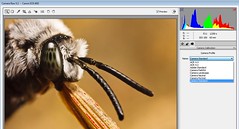
Picture Style Support!
I just installed Adobe Camera RAW 5.2 and found this jewel on the Camera Calibration tab -Thanks Adobe!
Monday, December 8, 2008
Will Work for Credit
Photo credit, that is. If you are a professor or scientist looking for images then contact me; I often license my work for as little as a photo credit. You get uncropped images of a wide variety of insects and I get some publicity –we both win. This is where I post my best work. I realize that a lot of text books have limited printing runs and are produced on a very tight budget, so I’m willing to work with you to get some exposure for my images. You can contact me here by posting a comment or send an email to dalantech@gmail.com
If you are putting together a calendar or a book on macro photography then I expect to get paid ;) Please see Tom Stack and Associates. Tom is managing my portfolio and has access to all of the images at my Flickr account.
If you’re reading this and know of anyone who is looking for my kind of photos then please pass this information to them.
Thursday, December 4, 2008
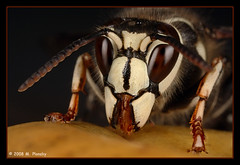
Banded Eye Drone Deconstruction
This one is going to be a slight departure from my previous deconstructions in that I’m going to talk more about the light in this shot than how I shot it. I will tell you that I used the Left Hand Brace Method to take it –check out the tutorial for the details.
For quite some time now I’ve been using the two flash heads of the MT-24EX in a fill / key concept. One flash head toward the top of the lens as the Key light to illuminate the area that I’m shooting (and the subject) and the other flash head lower and to the side as a Fill light to bring out details in the shadows. One of the problems with using two flash heads is glare –and I always mistakenly assumed that two flash heads meant twice the possibility of getting a hot spot. But I was wrong…
Recently I put both of the flash heads on Kaiser adjustable flash shoes thinking that changing the angle between the flash, subject, and sensor would help to eliminate some reflections. But all it really did was move the reflections to another part of the critter I was shooting. While looking at the photos I had taken a light bulb lit up in the back of my head: The glare was due to the angle between the flash heads, subject, and sensor –it was always the same for both of the flash heads. It didn’t matter that they were on a different part of the flash mount; the angle was always the same. Add to the flash the harsh sunlight that I typically shoot in and hot spots or a red channel that is too much to the right in the histogram is almost always going to be a problem.
So why not elevate a single flash head so that the MT-24EX’s flash heads are not at the same angle relative to the subject…
Since I’m using one as a Key and the other as a Fill it made sense to me to elevate the Key flash since its job is to illuminate the subject and the scene around it. I then attached the Fill light directly to the Canon flash mount and this is the result:
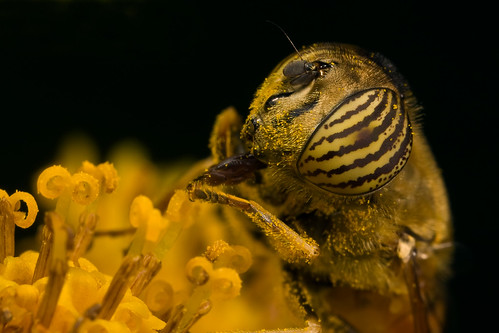
Very little glare –just a few pixels in that entire image. There is a slight shadow under the Drone’s eye, good for adding depth to the image, but there is plenty of light from the Fill to bring out the details. The kind of wrap around light that I like to shoot with simply because it isn’t dead even –if it were then the photo would look flat. This is how the flash heads look on the Canon mount with the Key elevated:
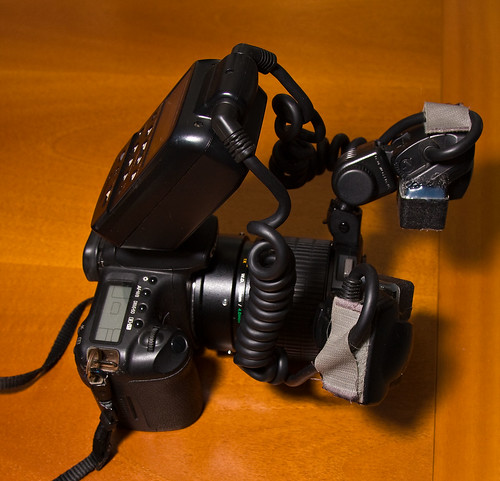
Footnote: If you really want to improve your macro photography then start viewing the light as a compositional tool and look for ways to manipulate it to get the effect you want...
For quite some time now I’ve been using the two flash heads of the MT-24EX in a fill / key concept. One flash head toward the top of the lens as the Key light to illuminate the area that I’m shooting (and the subject) and the other flash head lower and to the side as a Fill light to bring out details in the shadows. One of the problems with using two flash heads is glare –and I always mistakenly assumed that two flash heads meant twice the possibility of getting a hot spot. But I was wrong…
Recently I put both of the flash heads on Kaiser adjustable flash shoes thinking that changing the angle between the flash, subject, and sensor would help to eliminate some reflections. But all it really did was move the reflections to another part of the critter I was shooting. While looking at the photos I had taken a light bulb lit up in the back of my head: The glare was due to the angle between the flash heads, subject, and sensor –it was always the same for both of the flash heads. It didn’t matter that they were on a different part of the flash mount; the angle was always the same. Add to the flash the harsh sunlight that I typically shoot in and hot spots or a red channel that is too much to the right in the histogram is almost always going to be a problem.
So why not elevate a single flash head so that the MT-24EX’s flash heads are not at the same angle relative to the subject…
Since I’m using one as a Key and the other as a Fill it made sense to me to elevate the Key flash since its job is to illuminate the subject and the scene around it. I then attached the Fill light directly to the Canon flash mount and this is the result:
Very little glare –just a few pixels in that entire image. There is a slight shadow under the Drone’s eye, good for adding depth to the image, but there is plenty of light from the Fill to bring out the details. The kind of wrap around light that I like to shoot with simply because it isn’t dead even –if it were then the photo would look flat. This is how the flash heads look on the Canon mount with the Key elevated:
Footnote: If you really want to improve your macro photography then start viewing the light as a compositional tool and look for ways to manipulate it to get the effect you want...
Saturday, November 29, 2008
Blowing Bubbles Deconstruction
It’s been a while since I’ve done an image deconstruction and I thought it would be cool to do one on my favorite bubble blowing photo. The folks with the pocket protectors think that insects expose the contents of their stomachs to the air to aid digestion –probably to speed up the growth of beneficial bacteria. What’s cool about it is that you can either catch a refraction in the “bubble” or use it as a lens to magnify the critter’s mouth parts, or in the case of this series both :)
Don’t tell the Mrs., but I frequently bait the window sill in the living room with honey. I do it because I know that a lot of insets are attracted to that window due to the amount of sunlight that it gets. I also do it because the window sills in our house are white, and they make the perfect reflector for the flash. Knowing that I’d get a lot of reflected light played a big part in where I placed the area of sharp focus in the next scene…

Link to a larger version -click on the image to make it expand.
I have one of the MT-24EX’s flash heads at the 11 O’clock position and the other at the 2 O’clock position (relative to me) so that I can get the light to wrap around the insect, but at the same time it’s not dead even on both sides –the critter looks 3D and not flat. But notice the area directly under the leading eye –there’s quite a bit of light there, maybe one stop less than the top and the right side of the eye. That’s because the window sill is acting as a reflector. I knew that the bottom of the eye would be well lit, so it needed to be in focus. I also knew that the bubble would also get the same light, and I wanted to make sure that I got all of the bubble and the fly’s mouth parts in focus. So I placed my depth as far back as I could and still get some detail in the leading edge of that eye. At four times life size and F8 I probably have about 1mm of depth to play with and I had to decide what to keep and what to toss out…
There are some hairs on the fly’s face close to the mouth that I could not get into the shot –just not enough depth. But no one who saw that first photo noticed –if they did then they didn’t mention it. Why? Easy –your eyes go right to the fly’s eye, then to the bubble, and then to the rest of the image. You’ll go straight to the eyes of every creature that you see due to a subconscious “fight or flight” reflex: “Is this something that I can kill or do I need to run?”. You then look at the bubble because it’s so prominent and because of the pattern of the mouth parts. The rest of the photo is immaterial…
In this next shot I have the same problem; the window sill is going to light up the underside of the eye. The bubble is smaller now, but the mouth parts are extended; the fly is drawing the bubble in because it’s trying to get away from me and the camera. So I have to pull the area of sharp focus a little closer to me to keep the bubble sharp. Remember those facial hairs that I didn’t get in the first photo, and that you didn’t notice? Here they are:

Link to a larger version -click on the image to make it expand.
The downside to the second shot is that the top of the leading eye is out of focus, just not enough depth at F8 to get it all in. I didn’t think to go to F11, and looking back I didn’t really have time either. The entire scene was one fleeting moment and sometimes you just have to make the best of it…
Footnote: Focus stacking would not have been possible for two reasons. The obvious one is that the fly was drawing the bubble in, so no two frames would have been exactly the same. The other is that every time the flash fired the fly jumped –I had to reframe and refocus for every shot.
Don’t tell the Mrs., but I frequently bait the window sill in the living room with honey. I do it because I know that a lot of insets are attracted to that window due to the amount of sunlight that it gets. I also do it because the window sills in our house are white, and they make the perfect reflector for the flash. Knowing that I’d get a lot of reflected light played a big part in where I placed the area of sharp focus in the next scene…
Link to a larger version -click on the image to make it expand.
I have one of the MT-24EX’s flash heads at the 11 O’clock position and the other at the 2 O’clock position (relative to me) so that I can get the light to wrap around the insect, but at the same time it’s not dead even on both sides –the critter looks 3D and not flat. But notice the area directly under the leading eye –there’s quite a bit of light there, maybe one stop less than the top and the right side of the eye. That’s because the window sill is acting as a reflector. I knew that the bottom of the eye would be well lit, so it needed to be in focus. I also knew that the bubble would also get the same light, and I wanted to make sure that I got all of the bubble and the fly’s mouth parts in focus. So I placed my depth as far back as I could and still get some detail in the leading edge of that eye. At four times life size and F8 I probably have about 1mm of depth to play with and I had to decide what to keep and what to toss out…
There are some hairs on the fly’s face close to the mouth that I could not get into the shot –just not enough depth. But no one who saw that first photo noticed –if they did then they didn’t mention it. Why? Easy –your eyes go right to the fly’s eye, then to the bubble, and then to the rest of the image. You’ll go straight to the eyes of every creature that you see due to a subconscious “fight or flight” reflex: “Is this something that I can kill or do I need to run?”. You then look at the bubble because it’s so prominent and because of the pattern of the mouth parts. The rest of the photo is immaterial…
In this next shot I have the same problem; the window sill is going to light up the underside of the eye. The bubble is smaller now, but the mouth parts are extended; the fly is drawing the bubble in because it’s trying to get away from me and the camera. So I have to pull the area of sharp focus a little closer to me to keep the bubble sharp. Remember those facial hairs that I didn’t get in the first photo, and that you didn’t notice? Here they are:
Link to a larger version -click on the image to make it expand.
The downside to the second shot is that the top of the leading eye is out of focus, just not enough depth at F8 to get it all in. I didn’t think to go to F11, and looking back I didn’t really have time either. The entire scene was one fleeting moment and sometimes you just have to make the best of it…
Footnote: Focus stacking would not have been possible for two reasons. The obvious one is that the fly was drawing the bubble in, so no two frames would have been exactly the same. The other is that every time the flash fired the fly jumped –I had to reframe and refocus for every shot.
Monday, November 17, 2008
Did Canon Forget Macro?
Dear Canon,
In the race to see who could cram more pixels onto a sensor did you forget about macro and closeup shooters? Not all of us can afford your “D” series bodies that have bigger sensors, so here we sit with cameras that don’t perform as well as we’d want them to at high ISO. In fact I seriously doubt you’ll see too many of us move to the 50D since the high ISO noise performance is worse than the 40D. If you’re interested, if you still think that armature closeup photography is important to you, then here’s what I’d like to see:
1: A camera in the XXD class with a 1.3 crop factor sensor that has no more than 12MP and large micro lenses. I’d like to think that you could build a decent 1.6 crop factor sensor, but even you can’t defy the laws of physics. A sensor that has a diffraction limit of F16 would go a long way…
2: ISO 1600 performance that’s as good, if not better, than the 40D at ISO 200.
3: A big, bright view finder to make focusing at high magnification with the MPE-65mm macro lens easier.
I’ve also got a cool idea for your next macro flash –one that’s so simple I’m stunned that no one else has thought of it. Since all of the weight in a 580EX II is in the lower section where the electronics and batteries are, and the flash capacitor is in the hinge in the flash head all you have to do is separate the two with a coiled cable –one that’s about the same length as the cables you currently use for the MT-24EX. Supply a lens mount for the flash head and give it the same type of tilt swivel base that you use for the MT-24EX’s flash heads and you’re done. Macro shooters will love you since they’ll have a powerful flash mounted at the end of the lens close to the subject to help keep flash durations low and to make diffusing the flash easier. All of the weight will be centered and back toward the photographer on the camera’s hot shoe so hand holding the rig will be easy –one of the main reasons why I shoot with the MT-24EX is because I shoot nearly all of my macro hand held and I need a balanced camera. Separating the flash head from the base controller with a cord would give me that balance. Do not make it wireless! Adding batteries to the flash head section would just make it heavy. Event shooters would also benefit from a “corded flash” since they could mount the head on a bracket and have a rig with better balance –all the weight would be on the hot shoe.
In the megapixel race the only losers are closeup and macro shooters Canon –bigger numbers don’t impress us. Image quality does, and I’m finding the 1.6x crop factor sensors lacking…
It would also be cool if you would fix the problem in the 40D that seems to cause it to use Average E-TTL metering with the MT-24EX even if Evaluative E-TTL is set in the camera -or the metering system is just horribly broken since it's not even remotely consistent. Two letters to Mr. Chuck Westfall and still no response…
Thursday, November 13, 2008
Masters of Macro - Mark Plonsky
When I came up with the idea for this series there was one photographer that I had to interview, a shooter who’s been a big influence on a lot of other macro photographers and a man that I consider to be my mentor; Professor Mark Plonsky. It wasn’t so long ago that I’d take a photo and think that I’d done pretty well, but Mark would look at it and tell me that I could have gotten closer. I’d take a look at my shot, look at Mark’s words, take another look at my shot, and say a few choice words under my breath because he was right. I could have gotten closer, not because the insect was docile but simply because I didn’t try. I got the shot that I wanted and figured that if I tried to move in the subject would just take off so why bother. In short I psyched myself out because I told myself that I couldn’t do it. More than anything else Mark taught me to push myself and to think outside the box –I owe him for a lot of the photos that I currently have in my gallery and it is with great pleasure that I bring you Professor Mark Plonsky!
John: First can you tell us who Professor Mark Plonsky is -where you live, what you do for a living?
Mark: I am a professor of experimental biopsychology at the University of Wisconsin in Stevens Point. I also serve as a k9 behavioral consultant for problem dogs, in other words, I am a dog whisperer. I typically keep to dogs of my own (shepherds). I am also a father of 3 kids, an athlete, and I like to take pictures.
John: Who influenced you early on when you first got into macro?
Mark: As a scientist, I am curious by nature. My first camera couldn't capture the dog action I had hoped, but it was great at taking pictures of bugs (with the appropriate attachments). I was looking at images on various photo sites and figured I would give it a try. I have had no formal training. I study a lot about photography from the internet and talk with folks like you on occasion.
John: What is it about macro that has you hooked?
Mark: You can see what you normally cannot and life is fascinating in all of its forms.
John: What is your favorite subject to shoot and why?
Mark: Insects because they are alive and yet so alien.
John: If you could only have one lens what would you choose and why (assuming that you also have access to any light source you want as well)?
Mark: That is a tough one. I love each of my many macro lenses. Probably the canon 100mm macro. It is the most versatile. With teleconverter's and tubes you can get a lot of magnification; it is a fast lens that is good for portraits of people as well.
John: What lens do you recommend for someone who's just getting into macro?
Mark: Canon’s 100mm macro.
John: Do you spend a lot of time in post processing or do you like to "get it right" with the camera?
Mark: I love to get it right with the camera, but I also spend a lot of time post processing since I have an illustrative style.
John: Is there any advice that you’d like to pass on to the people reading this interview? Parting thoughts?
Mark: if you want to get good, shoot, shoot, and shoot some more. Then study what you have and go out and shoot some more.
John: Sage advice indeed…
I’d like to thank Professor Plonsky for taking time out of his busy schedule to take part in this interview, and for answering all of my stupid questions when I was a newby!
Tuesday, November 4, 2008
Image Thief
This is the reason why I don't allow the general public to view my full sized images on Flickr anymore. That photo isn't "free", and I never gave that (L)user the right to add it to their gallery.
Note to Flickr: I love the site, but you really have to give the photographer better options for how their images are displayed. I'd love to give the public access to slightly bigger image files (even though I risk getting robbed) but until that happens I'll just send everyone to my Deviant Art account...

Note to Flickr: I love the site, but you really have to give the photographer better options for how their images are displayed. I'd love to give the public access to slightly bigger image files (even though I risk getting robbed) but until that happens I'll just send everyone to my Deviant Art account...
Freezing Motion
One of the "tricks" that I use to get razor sharp images is to get my flash duration as short as possible. Normally by getting the MT-2EX's flash heads close to the subject and using a diffuser that diffuses the light but blocks as little light as possible. IMHO macro is really a form of stop motion photography. Although this video has nothing to do with macro it is about using a short flash duration to freeze motion. Chase makes four points concerning freezing motion and all but the second one is relevant to shooting macro. The first point is to keep the ambient light to a minimum and you can do that just by shooting at life size or higher magnification while setting the camera to a high Fstop (F11) and a low ISO (100 is best). Take a shot without the flash and if you can see any part of the subject then there is a chance that the ambient light in the scene is going to be a problem. One work around is to set the flash to second curtain sync, so that the flash is the last light source that the camera records. If there is any motion blur freezing the scene right before the shutter closes with second curtain sync can help to hide it. Points three and four are pretty self explanatory:
Discussion on freezing motion.
Discussion on freezing motion.
Monday, November 3, 2008
Living Pixels is Live!
Allan Melsen has built a new web site dedicated to macro and closeup photography called Living Pixels and it's my pleasure to announce that it is live! Allan was kind enough to ask me to join the staff and I'll be available to answer questions that you might have as well as share photos with you -and I hope you register and share your work with me! To my knowledge this is the first site dedicated to macro and closeup photography, and due to the level of interest in the discipline it couldn't come at a better time! Macro and closeup shooters deserve a site dedicated to their craft!
Living Pixels is going to be my new home on the web with exclusive material published on the site before I publish it anywhere else -so register and join Allan and I in making macro and closeup photography better!
Living Pixels is going to be my new home on the web with exclusive material published on the site before I publish it anywhere else -so register and join Allan and I in making macro and closeup photography better!
Monday, October 27, 2008
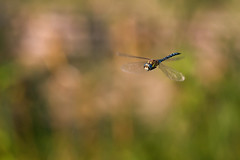
Dragons In Flight Tutorial
Given the choice I’d much rather shoot dragonflies on the ground, but there are some species that always seem to be in motion when I’m out with the camera. After a few attempts at shooting them in flight, and a lot of trial and error, I found a way to take shots of airborne dragons that seems to work pretty well –at least for me ;) Hopefully there will be something in this tutorial that you can use or adapt to your own style of shooting.
I don’t have a high end camera so my 40D only has nine auto focus points. Since I’m into composing with the view finder and will not allow myself to crop there never seems to be a usable auto focus point –the critter is rarely under one of them and the camera is much more likely to lock onto the background. So with the auto focus turned off on a 250mm macro lens (the 180mm L + a 1.4x teleconverter) I set the focus ring on my lens somewhere between the 2 and 5 meter mark –the critter is going to have to be close otherwise it’s going to look too small in the frame. I have the phrase “Clockwise gets close” stuck in my head, since turning the focus ring clockwise will bring the focus point toward me…
I set the camera to manual mode and either F5.6 to F11 depending on how much natural light is in the scene. I want to keep my shutter speed at or higher than 1/640 of a second since I’m hand holding a long lens (forget the 1/focal length rule for this type of shooting –it doesn’t work) and while looking through the lens in the general area where I expect to take the photo I want to see that the light meter is hovering around the -1 EC mark. I’ll adjust the ISO as necessary, but it’s pretty common for me to shoot natural light close-ups at ISO 400. NoiseWare Professional is extremely good at removing sensor noise and preserving detail, and for this type of shot I don’t need to see every lens in the dragon’s compound eye anyway.
Lately I’ve been using a 580EX II camera mounted with a 1/8” grid (to keep from throwing light everywhere) and with a ¼ CTO gel (to warm up the light from the flash). Since I’ve got an 81A warming filter on the lens I can turn what would be a rather harshly lit scene into one that looks more like it was shot in the early morning or late evening. Adjusting the white balance in post does not have the same effect, but if you don’t want to use the warming filter then you might not want to use the CTO either. In post you’ll have two completely different light sources (harsh ambient and warm flash) and there won’t be much that you can do to fix it.
I have the flash in E-TTL mode without any flash exposure compensation and it seems to work really well for subjects that are at least one meter from the front of the lens. Closer than a meter and I’m usually at -1 FEC or more. The reason for using the flash is simple: In post I’m going to raise the exposure and the gridded flash causes the subject to be exposed at a slightly higher level than the background. When I raise the exposure I can keep the background darker relative to the subject and it makes the dragonfly “pop” off of the page. I can also keep the background under exposed a little to keep the colors saturated –so that mid day sun doesn’t look like mid day sun…
Now all I have to do is wait for the dragonfly to get within range and hover, and I can usually tell where to stand by watching its feeding habits. Most insects are creatures of habit and dragonflies are no exception –they’ll get into a pattern of stopping in certain places. Once the critter hovers I quickly course focus the lens by turning the focus rind and then fine tune the focus by slighting moving my body back and forth. I refocus for every shot and I take, and delete, a lot of frames…
In post I raise the exposure, bump the contrast, sharpen the image with Focus Magic (easier to use than USM –less of a chance that I’m going to over sharpen the photo), run NoiseWare to remove sensor noise, adjust the levels to set a black point, add my copyright info to the EXIF data and save the image.
Friday, October 24, 2008
Masters of Macro Interview Series
When I was in university I had the hardest time with my electives. I’d frequently ask my professors “Why do I have to take Chinese Underwater Basket Weaving 101?! It has nothing to do with becoming an Electronics Engineer!” Their sage advice was always “To give you a well rounded education. Now shut up and finish my basket!”. To that end I give you the Masters of Macro Interview Series. Over the next few months I’m going to interview a wide range of photographers in the macro discipline to expose you to many different photographic styles. I’ve often said that the best advice I can give to new shooters is to cherry pick what you see other people doing and add your own style to it. Now’s your chance to do just that from some of the best in macro!
I should have the first interview up in a week –stay tuned…
I should have the first interview up in a week –stay tuned…
Wednesday, October 8, 2008
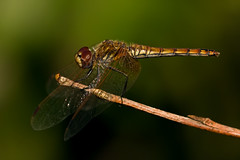
Shooting Close-ups in Harsh Light
Often I find myself shooting in less than ideal conditions and if I waited for perfect weather or light I’d rarely get a chance to shoot, so one of the things that I wanted to teach myself was how to photograph insects using a mix of natural light and flash. Since portrait photographers often under expose the ambient light in a scene and then use a flash to expose the subject I thought that would be a good place to start. After reading several examples at Strobist (a site that you should all be reading as well) I set out to play. This is what I’ve learned so far…
The trick is to keep the sun at an angle that's either to the side or behind you. The sun is going to be your light source for the background, and the sun + the flash will be your light source for the subject. You want to under expose the background to force the colors to saturate (I'm not shooting in good light) and to use just enough flash to keep the subject from being too dark to see any detail. I shoot in manual mode, and I set the aperture to F8 because it’s usually enough depth for the magnification that I’m shooting at (usually 1/3 life size). I set the ISO high enough to allow me to use a shutter speed of 1/640 of a second or higher –tripods and I just don’t get along. On a few rare occasions I find myself at ISO 800, but for the most part I’m shooting at ISO 400. Don’t worry about noise, since you’re going use noise removal in post (I use NoiseWare Professional because it’s great at removing noise and preserving detail). Since the ambient light in the scene is going to be under exposed you’ll actually have a lot of latitude in how you set up the camera.
I’m currently using an MR-14EX ring flash as my fill light just because I like the quality of the light that I get from it and the balance of that flash –all the weight is back by me. Any diffused light source will work just fine though. Set your flash to manual mode and the power level will depend on the flash you use and the scene that you’re shooting. I have the MR-14EX (on a Canon 180L macro lens) set to 1/32 power most of the time. If you use E-TTL then set the flash to at least -2 FEC.
Once you find a willing subject take a shot and look at the histogram -you don't want to see any blown color channels and the overall exposure should be to the left (dark). Do not use the preview image on the LCD to gage exposure or sharpness -for the most part. For the grape vine that the dragon is perched on in the sample that I’ve included in this tutorial I wanted it to look brown on the preview. If the shade of that vine was too pail then I'd either under expose the ambient more if the background looked too bright (increase the shutter speed), or decrease the power from the flash if the background looked good to me. The image you see on your camera's LCD should look very under exposed. Later when you get the photo on the computer you simply raise the exposure during RAW processing. While watching the histogram increase the exposure, stopping right before one or more color channels blow out. Increasing the contrast will also give you a little more room to increase the exposure.
I then run NoiseWare Professional, adjust the levels to set a black point and shift the grey point, use the auto sharpen option in Elements, and add my copyright to the EXIF data. Save the image as a JPG and I’m done.
Saturday, September 27, 2008
Macro Q&A: What lens?
koauke writes,
"Hi, I was admiring your macro work and was wondering if I could ask you a question. I'd like to get a macro lens for my Canon XSi (450D) and was wondering if you could give me some advice. Would the Canon 100mm macro be better for insect photography than the 60mm EF-S?"
Here's my responce: In my humble opinion there is no such thing as a bug lens -it's the insect and your ability to get close that will determin if you get the shot and not the working distance of the lens. Having said that I think that lenses in the 100mm range are easier to use for a beginner since there is less of a chance that you are going to cast a shadow over the insect and scare it off. But if you watch the angles that you shoot from the EF-S 60mm is actually a better lens.
The image I've included with this post was taken with the EF-S 60mm + a 250D closeup and an 81A warming filter in natural light (no flash).
Until next time happy shooting :)
Friday, September 26, 2008
Canon 40D Light Meter Error Example
The small image to the right in this post is the same critter that I'm posting as an example of the 40D's light metering problem when using the MT-24EX. I had to bring the exposure down 2/3 of a stop, so it was possible to recover the shot.
This next photo is the same critter and the exact same scene, but this image is more than two stops over exposed:

Keep in mind that I had the FEC on the MT-24EX set to -2/3 (via the 40D). The exposure wasn't just off because I set it wrong, it varied by two stops for the same scene. To make matters even more interesting is that I can change the 40D from Evaluative E-TTL mode to Average E-TTL mode and the way the 40D exposes a shot with MT-24EX won't change -and that tels me that the MT-24EX is not operating in Evaluative E-TTL mode when connected to the 40D -a problem I never had when shooting with the Xti...
Canon you really need to fix the metering system in the 40D because until you do I can't recommend any of your newer cameras because they could have the same problem. I'm not the only one who's had issues with the 40D and the MT-24 -see this thread at DPR or this post at Fred Miranda ...
This next photo is the same critter and the exact same scene, but this image is more than two stops over exposed:
Keep in mind that I had the FEC on the MT-24EX set to -2/3 (via the 40D). The exposure wasn't just off because I set it wrong, it varied by two stops for the same scene. To make matters even more interesting is that I can change the 40D from Evaluative E-TTL mode to Average E-TTL mode and the way the 40D exposes a shot with MT-24EX won't change -and that tels me that the MT-24EX is not operating in Evaluative E-TTL mode when connected to the 40D -a problem I never had when shooting with the Xti...
Canon you really need to fix the metering system in the 40D because until you do I can't recommend any of your newer cameras because they could have the same problem. I'm not the only one who's had issues with the 40D and the MT-24 -see this thread at DPR or this post at Fred Miranda ...
Sunday, September 21, 2008
Technique
Recently over at the Fred Miranda Macro Forum we were having a friendly discussion about which macro lens is best -and granted, we all know that it's the photographer who makes the image and not the gear. But I couldn't help putting my .02 in for the Canon MPE-65mm macro lens as well as add a few photos to the thread and the original poster had this to say:
“Very nice...I wonder, were these insects glued in place or dead from the freezer?, because I dought the working distance of the MPE 65mm is more than a couple of inches at best and I know how hard it is to capture shy bugs with a lens barrel looming up close to them...”
This was my response:
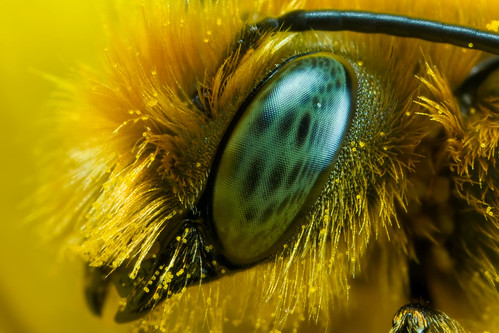
A fair question. I never shoot dead insects, but I do study the behavior of live critters so I can take advantage of their quirks to get close. With bees I get most of my photos in the early spring when the temperatures are low and the sun dips behind the clouds (the bees need the heat to drive their metabolism)...
5x
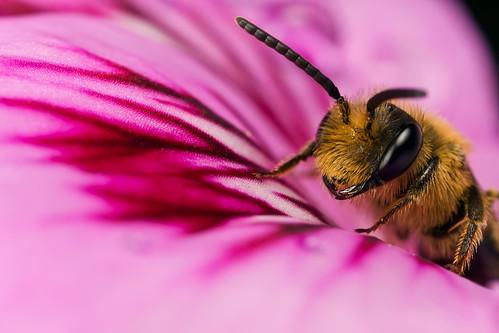
...or after it rains (notice the wet hair)...
2x

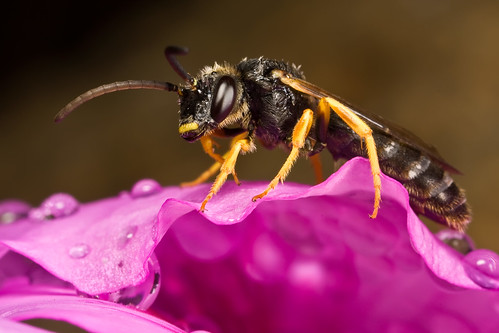
...or early in the morning when it's still cool...
2x
...and they are covered in dew...
2x
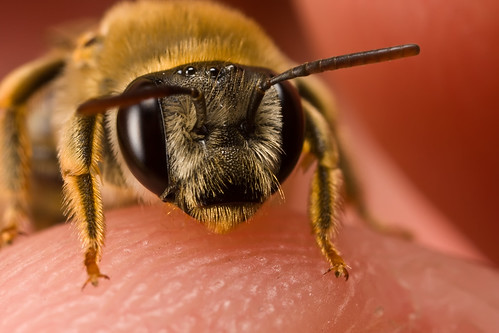
...sometimes they'll even crawl onto your hand to get warm...
2x
...or shoot late in the day when they have perched for the night (this one is sleeping and I'm holding onto the twig)...
2.5x
...you can even shoot very timid insects when it's windy since they would rather deal with you than the wind...
2x

...so you see there really is no such thing as a "bug lens" and that having a short working distance actually allows me to get photos that I wouldn't be able to take with longer glass...
“Very nice...I wonder, were these insects glued in place or dead from the freezer?, because I dought the working distance of the MPE 65mm is more than a couple of inches at best and I know how hard it is to capture shy bugs with a lens barrel looming up close to them...”
This was my response:
A fair question. I never shoot dead insects, but I do study the behavior of live critters so I can take advantage of their quirks to get close. With bees I get most of my photos in the early spring when the temperatures are low and the sun dips behind the clouds (the bees need the heat to drive their metabolism)...
5x
...or after it rains (notice the wet hair)...
2x
...or early in the morning when it's still cool...
2x
...and they are covered in dew...
2x
...sometimes they'll even crawl onto your hand to get warm...
2x
...or shoot late in the day when they have perched for the night (this one is sleeping and I'm holding onto the twig)...
2.5x
...you can even shoot very timid insects when it's windy since they would rather deal with you than the wind...
2x
...so you see there really is no such thing as a "bug lens" and that having a short working distance actually allows me to get photos that I wouldn't be able to take with longer glass...
Sunday, September 14, 2008
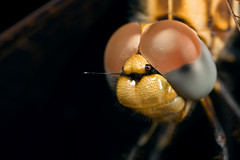
40D and the MT-24EX Flash Metering Problem
Early this year I switched from using Canon’s Xti to the 40D and at the same time I was working on getting better diffusion from the MT-24EX. Oddly enough I was having exposure problems with the 40D that I never saw with the Xti: Scenes that the Xti would normally under expose by 1/3 of a stop the 40D would over expose by that same 1/3 of a stop or more. If I took six frames of a scene none of them would be exposed the same and they’d all be over exposed even though it’s normal for me to shoot with the MT-24EX set to -2/3 FEC.
Even shooting against something reflective would give me over exposures even though the camera should have under exposed. At first I thought the 40D was “hyper accurate” and that there was something wrong either with my technique or the diffuser materials that I had used on the twin flashes but as time passed I read more and more people make the same claim –the MT-24EX just doesn’t work well when attached to the 40D. The problem will manifest itself the most when you are shooting a subject when there is very little in the background for the flash to reflect off of –if the background is black in the final image then odds are the subject is completely blown (a problem that I never had with the Xti).
SteB, one of the posters at DP Review mentioned having the same exposure problem that I was seeing and that it seemed like the MT-24EX was operating in Average E-TTL mode instead of Evaluative. Sure enough switching the 40D to Average E-TTL mode seems to give the same exposures as Evaluative in my informal field testing. The work around that I eventually come up with is to make sure that the flash heads were pointed right at the scene I was shooting and to keep one flash head off centered from the top of the lens at the 11 O’clock position and place the other at 2 O’clock (relative to me). The angle of the heads depends on what you’re using for a diffuser –currently I’m using a pair of Sto-Fens over a piece of diffuser plastic that only blocks 2% of the light coming out of the flash. So I position the heads one click up from all the way down at life size and all the way down toward the lens for 2x to 5x shooting. The image included with this post is the result of an entire macro season of trial and error trying to solve the metering problem and get good light quality at the same time…
I’m still not getting consistent exposures, but it’s better than putting one of the flash heads at the very top of the MPE-65mm: It seems like one side of the subject gets thrown into too much shadow so the light meter over compensates for it –badly. If you see some insects with two sets of eyes and eight sets of wings it’s my fault cause the MT-24EX pumped out so much power it altered the critter’s genetics…
I contacted Canon on this issue and they responded to me very quickly –but their solution was for me to send all of my kit into a Canon service center. Unless they test my rig against the same scenes I shoot then they’re not going to see the problem and besides it not just a problem with my camera or flash…
So here's what I need you to do: If you shoot macro with the 40D and the MT-24EX then please respond to this thread at DPR or this post at Fred Miranda and tell me if you are getting consistent exposures or not. If you are then please tell me a little about your technique and the types of scenes you shoot. If enough people post then maybe we can get Canon to take a serious look at the 40D's light meter...
Friday, September 12, 2008
The Diffraction Debate
I’ve contended for years that diffraction, although a real photographic effect and defect, is not the big boogeyman that some people make it out to be –that getting a sharp image circle and controlling motion during the exposure are infinitely more important. It’s also my humble opinion that a lot of what people are calling diffraction is nothing more than “macro motion blur” –slight movement, maybe as little as the width of half a pixel, that robs the image of detail…
I base my opinion on experience –from the time that I started concerning myself with flash duration and making it as short as possible the detail in my images has gone up, like the shot included with this post that was taken at 5x and F11. I’m frequently asked if I focus stack my images due to the level of detail in them and the depth. I played with stacking almost two years ago and didn’t like the effect it had on the background and the overall composition of an image –all of the photos you see in my galleries are single frame. The depth and the sharpness come from carefully controlling where I place the area of acceptable focus and from a short flash duration.
So I know that it’s a myth that the flash duration, no matter how long, can always freeze motion. At the risk of sounding like I have my nose in the air: The proof is in my images…
I can understand why some people would get confused: You’re shooting at 3x, F11, and ISO 100 (the shutter speed isn’t really important since at those settings you’re not going to get any ambient light into the lens anyway). You take a shot and it’s just not as sharp as you’d want it to be, so you drop down to F8 and you’re image has more detail. So diffraction lost, right? Well, there’s just one little problem: When you changed from F11 to F8 the amount of light your flash had to produce to give you a proper exposure dropped in half, so your flash duration for the F8 shot was half as long (or twice as fast) as the flash duration for the shot you took at F11. So did diffraction rob you at F11, or did a “faster virtual shutter speed” defeat motion blur at F8? Hmmm…
Getting your flash closer to the subject, and using a diffuser that diffuses the light instead of just blocking it, will give you shorter flash durations and you just might get the level of detail you’re looking for when shooting at high magnifications and Fstops –but you’ll never try it as long as you believe the diffraction myth…
There’s an interesting thread over at DP Review and another at the Fred Miranda Macro Forum about this very subject. If you want to jump in then do yourself a favor and read the posts carefully –one person already tried to have a go at me by taking something out of context. One of the problems with the current debate on diffraction is that too many people have based their photographic style on the belief that diffraction is a big problem –and some of them don’t want to hear that they might be wrong…
Before I end this post let me make one thing perfectly clear: I don’t care how you take your photos, because how you get from a concept to a shot is irrelevant –the only thing that counts is the final image because that’s the only thing the viewer sees. No matter how this story ends it’s not going to change the way that I take photos since I’ve developed a photographic style that doesn’t require focus stacking –light and composition are infinitely more important than depth of field…
Thursday, August 28, 2008
National Geographic's Daily Dozen
This shot was chosen for National Geographic's Daily Dozen for August 28th 2008 (week 4).
Sweet! :)
This comes at a time when I've been putting a lot of effort into my composition and lighting, and it's cool to see it pay off -thanks National Geographic!
Sweet! :)
This comes at a time when I've been putting a lot of effort into my composition and lighting, and it's cool to see it pay off -thanks National Geographic!
Wednesday, August 20, 2008
Image Thieves
Several people decided to help themselves to the photos that I was posting on Flickr. Even though I didn't allow people to download the full size images as long as I had a Creative Commons license on the photos Flickr allows people to gain access to them -by design. Note to Flickr: That's just plain stupid...
If you want to see larger images then go to my Deviant Art Gallery where I set the maximum size to 1280 pixels wide and I can actually keep people from accessing full size images even though I have a CC license set on them.
I'm sorry I had to change the license on the images I post at Flickr -as much as I like to see the hidden world around me I enjoyed showing it to all of you more. But when you're a struggling amateur photographer who's trying to get published the last thing you need is for people to steal your images just because the coders at Flickr can't think outside the box...
Regards,
John
P.S. I also have a Recent Deviations sidebar on the blog that shows the latest images that I've posted at Deviant Art.
Thursday, August 7, 2008
Snooting an MT-24EX
Update: After using the snoot for two weeks I've taken it off. It worked well for some images, and didn't work so well for others so I've gone back to a basic piece of diffuser plastic for the MT-24EX's flash heads.
I’ve built, and hot glued, so many different diffusers to my MT-24EX over the last two years that it looks like it has been in a war zone! Every time I come up with a new way to diffuse the flash I learn a little more about flash photography and I get a little closer to the light that I’ve been looking for.
Today I built a snoot for my MT-24EX and it might be the last diffuser I make…
In order to get good diffusion with the flash I really have to get it close to the subject. Granted I could make a bigger diffuser, and I’ve done just that on more than one occasion. But I’ve had a hard time striking a balance between diffuser size and the short working distances above life size –at 5x the flash heads are only about an inch from the subject…
I was going through some camera gear that I had in a box when I stumbled upon a Lumiquest Promax Accessory Kit and it dawned on me that not only would the diffuser plastic work pretty good for the MT-24EX, but maybe I could cut up the reflectors and use the plastic to build a snoot. One of the problems with the MT-24EX on the MPE-65mm is that a lot of the light is wasted –even at life size I’m trying to light a really small scene. I don’t need the light from the flash going everywhere, and as close as I have to get the flash heads to the subject “spill” can be a problem. Yellow flowers make extremely good reflectors –so good that a lot of the light that’s spilling out of the bottom of the flash ends up bouncing back into the subject as an intense yellow light. Sometimes it creates an interesting lighting effect, and sometimes it just blows out all the highlights…
I’ve taken a few test shots and the results are so good that I thought I’d write about it before I go on vacation (I’ll be out at the farm until the end of next week). I’ll end this with one of the images I shot. The recycle time of the MT-24EX is almost instantaneous –even at 5x. So that tells me that I’m getting most of the light right where I need it. I’m also getting really good exposures even when the background is black because most of the E-TTL pre-flash is hitting the subject…
Tuesday, July 29, 2008
Left Hand Brace

Since I do all of my macro hand held (the critters I go after are normally too active for a tripod to be practical) I’m always looking for a way to brace the camera. First because I don’t crop and composition is important and keeping the camera steady helps me to place the critter where I want it in the frame, but also because the flash can’t freeze all the motion in the scene. No matter how short the flash duration is it will never be short enough to give you sharp details if there is a lot of movement. I’m convinced that a lot of the image softness that people blame on diffraction is really nothing more than a form of “macro motion blur”.
One trick that I’ve been using to keep everything steady I’m going to call the “Left Hand Brace” method, and here’s how it works: I’ll slowly take hold of the flower that the subject is on by pinching the stem between my left index finger and thumb. I’ll then brace the lens on that same hand and focus the scene by sliding the lens. Since the flower and the lens are all on the same support (my left hand) when one of them moves they both move so it’s easy to keep everything perfectly “still” and I have a lot of control ever where I put the area of sharp focus. Another benefit of holding onto the flower’s stem is that I can slowly rotate the flower and change the angle to get different compositions.
It doesn’t always work, and it helps if the critter is hungrier than it is scared of me, but when I am successful at holding onto the flower I can get some very unique images that are razor sharp even when shooting at high magnification and Fstops. The image included with this tutorial is a recent example of what I can do with the Left Hand Brace method.
Friday, July 25, 2008
Tutorial Updates
Almost the end of July and only two posts *sigh* Where does the time go?! Sorry folks -it's "macro season" so I've been doing more shooting than writing. You can expect a few more image deconstructions next week as soon as I get back from a short trip to Rome and the farm in Gaeta.
I did manage to update two tutorials: Shooting Dragonflies with an old technique that I use to use for getting close to dragons that I forgot to add to the original and the MT-24EX Users Guide with a helpful tip if you've been having problems getting good exposures on subjects when the background is dark.
I like the format at Deviant Art so much that I set up a Turorial Section where I'll be posting all of my tutorials, and it's the only site that will have the latest updates.
At some point, probably after this macro season, I'm going to put together a book on macro photography organized by the different types of critters that I shoot with tips on how to get close to them as well as exposure information (flash settings, angles, etc.). I'm not sure if I want to do an actual physical book or an e-book. If you'd like to cast your vote for one or the other then leave me a comment.
Take care, and happy shooting! :)
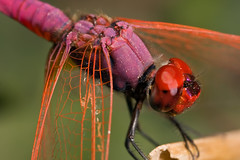
Thursday, July 3, 2008
Sleeping Solitary Deconstruction
This shot at five times life size of a solitary bee is deceptively simple once you know how I took it. First off I have the MT-24EX set to -2/3 FEC and I have the flash heads on the flash mount that Canon supplies with the flash. If you own the MT-24EX then you know that the flash heads make a clicking sound when you move them -there are graduated stops built into the base of the flash heads. I started off by moving both heads all the way down toward the lens and then I brought them back up "one click". I have the heads at that angle for 2x to 5x shooting (two clicks up for life size). Then I turned the flash heads toward each other one click (they were both facing straight out initially). I turned them toward each other because I wanted both heads to pump as much light into the scene as possible and to deepen the shadows. There really isn't anything in that shadowed area in the lower right hand corner of the image, and by letting it fall out I'm making it easier for you to focus on the eyes of the bee. I positioned one flash head at the top of the lens and the other to my left -you can see where they are by the reflections in the bee's eyes.
Since the bee was on rather long plant stem, and was pretty much fully asleep, I could move it around quite a bit. So I positioned it close to the ground with my left had so I could get some of the light from the flash to bounce off of the background and back into the camera to keep the area behind the bee from being completely black. At five times life size the flash is going to fall off quickly so I had to get within a few inches of some grass to get anything to show up in that upper left hand corner.
Now that I'm holding onto the plant stem that the bee is roosting on with my left hand it's a simple matter of resting the lens against that same hand and then slide it to get the focus point where i wanted it. Because of the way the MT-24EX's flash heads were positioned the focusing lamps were useless, but I had enough natural light anyway. See those hairs at the leading edge of the critters eye? That's what I concentrated on when I was focusing the scene. The lenses in the eye aren't easy to see sometimes, but it's easy to tell when those hairs are in focus. Also notice that I'm shooting from an angle that almost puts the eye perpendicular to the lens. Since the plane of sharp focus is also perpendicular to the lens most of the eye is razor sharp. I took four frames at 5x and I refocused for each shot. Of all of them I liked the sharpness and the composition of the image in this post.
I had the camera set to F11, 1/250 (max sync speed for the Canon 40D) and ISO 100. I'm also shooting with a Hoya 81A warming filter. In post all I had to do was run NoiseWare Professional, adjust levels (set a black spot), auto sharpen, and then rub out dust spots with the healing brush before saving the image as a JPG. Not much to post processing because most of it is done before I press the shutter release ;)
Happy shooting!
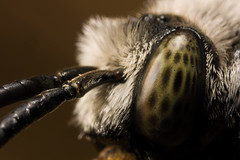
Monday, June 23, 2008
My Current Settings
I was recently asked by someone who had just bought Canon's 100mm macro about the settings that I use. Here's my response:
Hey Chris,
Some of the setting info you asked for does come with experience -and it really depends on your shooting style. But here's what I use, and keep in mind that I don't use a tripod or a monopod.
For closeup photography (1/4 to 3/4 life size):
Shutter priority 1/400 with the ISO set to 200 - 800 depending on what aperture I'm getting with that shutter speed. I try to shoot no lower than F5.6. Normally I'm in shutter priority if I'm trying to freeze a little subject motion.
Aperture priority F5.6 to F8 with the ISO set to 200 - 800 depending on the shutter speed I get with the aperture setting. I try to keep the shutter speed at twice the 1/focal length rule. So if I was shooting with the 100mm I'd want my shutter to be no lower than 1/200. Great for when I'm trying to control the depth and there is little to no movement in the scene.
A flash can be used for both of those settings for fill light to bring out more detail in the subject, but set the flash to -1 1/3 to -2 FEC and diffuse it. You want just enough light to fill in the shadows a little, but not so much that the resulting image looks like it was taken with a flash...
For macro:
With few exceptions (like low depth of field flower shots) I shoot in manual mode F11, 1/250 (the max sync speed of the Canon 40D) and ISO 100. At those settings when shooting at life size or higher magnification that flash will be the only significant source of light in the scene so the shutter speed is irrelevant -the duration of the flash is your shutter. the key to getting sharp images when shooting macro is to diffuse the flash and get it as close to the subject as possible. The closer the flash is to what you are shooting the shorter the flash duration will be -your "virtual shutter" speed will be extremely fast and you can freeze a lot of motion.
Any flash will do -just get it off of the camera and out toward the end of the lens. If you get a macro flash then I'd recommend the MT-24EX over the MR-14EX simply because the MR-14EX's flash heads are too close to the plane of the lens -getting good shadows, even with ratio control, is difficult. Using the flash mount that Canon supplies with the MT-24EX you can get the flash heads far enough from the lens plane to get good shadows and once you find a way to diffuse it (plastic from a milk jug works wonders) you'll get some really good light. I've never tried it, but you could also cut up a Lumiquest Soft Screen and use it as a diffuser.
Monday, June 16, 2008
Changes in my Gear
Just a quick note to let everyone know that I'm still here (been busy!) and that I've made some changes to the gear that I use. First up is the MT-24EX -I'm no longer using Gary Fong's Puffer diffuser. I contacted a company that makes diffusion plastics and they sent me a sales brochure with a sample of every plastic that they make. I took small strips of one of them and hot glued it directly to my MT-24EX's flash heads. Life size to twice life size is the toughest magnification range for me to shoot in and get good diffusion -past 2x the flash heads are so close to he subject that the apparent size of the flash relative to the subject makes getting good diffusion easy. So I'm including a life size shot with this post as an example of what I've been able to do with the new material. Here's a 3x shot so you can see how good the detail is -and how little glare I'm getting.
Also notice that the shadows are much more pronounced. One of the problems with using the Puffer is it's shape -that curve throws light everywhere. I've been able to get shadows with it simply because of the way I would place the flash heads on the mount, but the shadows were always "thin". With a flat diffuser the light from each flash head is a lot more directional so shadows look better, and are easier to control. As an added bonus the new material only causes me to lose about 2/3 of a stop so the flash duration is extremely low.
Several people have asked me if I use a tripod. The only time I use any kind of camera support is when I'm shooting water drops or abstracts in the house -out in the field I take every shot hand held. I'm not using any kind of brace other than an elbow on a knee. For both of the images in this post (and a lot of my recent shots) I'm holding on to whatever the critter is perching on with my left hand and I'm bracing the lens on that same hand to keep everything steady.
Now that it's "macro season" here I'll try to do more image deconstructions as a way to show you how I'm taking photos and hopefully you can pick up something from it that you can apply to your own style.
Happy shooting!
Thursday, June 5, 2008
How Working Distance Works Against You
I’ve been putting a little money aside for a while so I could pick up some new gear. Photography isn’t what I do for a living and with a wife and three kids I just can’t spend money on stuff that doesn’t help pay for the important things like electricity and food. But I managed to get in range of the Canon 180mm L macro and thought about finally getting it…
Over the course of this past weekend I talked myself out of spending the money –the 180L just won’t allow me to do anything that I’m not currently doing with the glass that I have and I don’t need the extra reach. In fact putting more distance between me and the subject could actually be detrimental. Take the shot I’ve included with this post, shot at three times life size with a Canon MPE-65mm lens. The only way I could get a sharp image of that honeybee was to hold on to the flower that it was feeding on. So with the flower’s stem pinched between my left index finger and thumb I rested the lens on my left hand and adjusted the focus by sliding the lens back and forth. Since the lens and the subject were on the same platform, my hand, I could keep the scene rock solid and take full control over where I placed the depth of field. Now imagine that same shot with a 180mm lens and two teleconverters (a 1.4x and a 2x) for 2.8x at a nine inch working distance.
I’d have to rest that bazooka of a lens on my forearm and try to shoot over the ridge of my thumb…
It’s not possible to take a shot of an insect on a flower without holding on to the stem –the slightest breeze is enough to throw the critter out of the plane of sharp focus. The best way to get a sharp, well composed image is to take full control of the scene and I just can’t do that by standing back with a long focal length lens. The 180L will have to wait for another day…
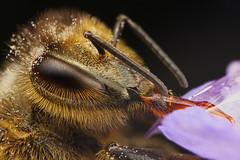
Wednesday, May 28, 2008
It's Not the Lens
It’s pretty common for someone to look at my work and then compliment me on the gear that I have. It use to bother me because it’s like going to someone’s house, enjoying a really good meal, and then complimenting the cook on their pots and pans. But I don’t let it get to me anymore because every time someone tells me that I have a great lens I know that their work will never compete with mine…
To be really good as a photographer you have to understand light, that it has different qualities, and how to take advantage of the light when it’s good or modify it when it’s bad. The light, more than any other aspect, will make or break an image. Given the choice between great light and an average lens or terrible light and a great lens I’ll choose the former every time –the resulting images will be infinitely better.
Granted I’d rather have great light and gear because I’ll have to do less post processing, and I think that’s what motivates some people to compliment others on their equipment.
Another important aspect of photography is knowing how to use the gear that you have, so you don’t have to rely heavily on post processing. The computer with never be able to replace data that you do not capture with the camera –it will never be that smart. So there’s a lot to be said for getting it right with the view finder and doing the majority of your post processing before you press the shutter release Take the image included with this post: I used a warming polarizing filter to get the detail you see in that dragonfly –something that isn’t possible with the filters in Photoshop…
In other news: If you've asked me for my help and I haven't gotten to you yet please be patient -I wasn't expecting the huge response that I got to my mentoring offer! I will get to you though, promise :)
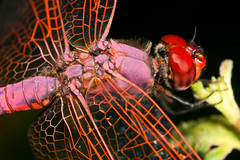
Monday, May 26, 2008
Mentoring Sign Up
When I posted "The Death of Macro" I was kinda stunned by the feedback -not a single person disagreed with what I had to say! It's also pretty clear that a lot of you would like help with your macro photography so here's one way to get it: Send me an email with a link to your online gallery and a list of the gear that you are currently shooting with. As time permits I'll check out your images and give you constructive criticism, and I'll also see if I can help you get the most out of the equipment that you have.
I'm not an expert -and I've never claimed to be. But if you want help here's your chance to get some honest feedback from someone who wants to see macro get a lot more respect, and that's only gonna happen if we all take really good photos...
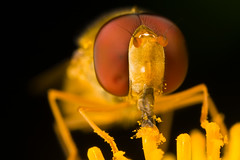
I'm not an expert -and I've never claimed to be. But if you want help here's your chance to get some honest feedback from someone who wants to see macro get a lot more respect, and that's only gonna happen if we all take really good photos...
Tuesday, May 20, 2008
The Death of Macro
No, macro isn’t dead –far from it! It seems to me that there are more people shooting macro, and interested in macro photography, than ever before. But the wave of excitement might just hit the beach and flatten out if the quality of macro images doesn’t improve…
In other disciplines, like birding, it’s very difficult to be at the top and the difference between being in the upper ten percent or the lower ninety is marginal –the “competition” is fierce! If you look at the photographers that are at the top they all have some similar things in common: They compose their images well, they know the difference between good light and bad, they understand how a flash works and how to use it, and they learn about the behavior of the subjects that they shoot so they can take advantage of it to get better photos. When they post their work and ask for constructive criticism then they get it –and most take what they are told and apply the advice to better their work.
But for some odd reason the same standards are not used in macro photography, and it’s killing our discipline! If I had a dollar for every time someone posted an out of focus, centered, image of an insect’s back side I’d have all the money I need for new gear. But if I had a dollar for every time someone told the photographer of that poorly composed, poorly focused image that they were doing a good job I could retire…
Giving someone positive feedback on a bad image is one of the most self serving and selfish things an experience photographer can do! It might make you popular with the masses, but you’re not helping anyone improve their work by being dishonest. If the people in the upper ten percent in macro really care about macro photography and really want to see the discipline get the respect it deserves then they are going to have to start giving honest, constructive criticism. Odds are you won’t be on too many Christmas card lists, but at least you’ll have the satisfaction of knowing that you’re making a difference –and you can point to the success of macro photography and claim that you had a part in making it happen…
Since I care about macro photography and I want to see it taken seriously as a photographic discipline I’ll give you honest, constructive criticism on your work if you ask me for it –but don’t ask me to critique your photos if you’re just looking for a pat on the back. I’ve also taken on a few people as their mentor, and I’m looking for new students, so if you need help with your macro photography contact me and I’ll start working with you to improve your photos. I challenge all of the top macro photographers to do the same…
One final note: I’ve stopped participating in “Barney Forums” –I love you, you love me web sites where you’ll get positive feedback on a photo no matter how bad it is. I can’t lend my support to those sites by being active on them when, IMHO, they are part of the reason why macro is not taken seriously as a photographic discipline…
Subscribe to:
Posts (Atom)