I’m probably the wrong person to blog about sharpening images –especially since I just started doing it. But after reading several articles on the subject, and everyone agreeing that it should be done, I decided that I needed to do some sharpening. The problem is that no one agrees about how much sharpening to apply. I’ve read too many horror stories about people who had to go back and re-edit all their photos because they went too far with Unsharp Mask –and I just don’t have time to fix hundreds of photos…
So I went looking for something that would clean up the “haze” in my shots but not get me into trouble later. I found it in Photoshop Elements 5. I just use the Auto Sharpen option under the Enhance menu. According to the help file Auto Sharpen will increase the clarity of an image without the risk of over sharpening.
Since I started using this past weekend I’ve noticed a significant difference in the sharpness of my images –a difference that I can see without resorting to viewing a photo at 100% pixels. No guess work, no risk of over sharpening, and it won’t sharpen a dull image so I still have to nail the focus. As an added bonus it’s fast, so my post processing time is still less than two minutes for any single image.
Perfect…

Tuesday, July 31, 2007
Monday, July 30, 2007
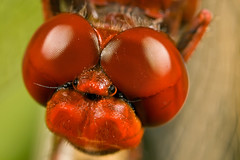
Color, contrast, and the MPE-65mm
If I could have only one lens in my camera bag it would be the MPE-65mm! Granted the working distance at life size is only four inches, and sometimes I find myself bumping the plant that the critter is on and scaring them off. But the color and contrast is so good that I can't make myself break out the 100mm, 500D diopter, and a 25mm tube for a twice life size shot like the one I've included with this post, even though the working distnace would be double (close to 5" with the 100mm rig instead of 2.5" with the MPE-65 set to 2x).
I didn't do a levels adjustment on that image cause it didn't need it...
I converted from RAW with some minor adjustments in exposure (actually decreased the contrast) and used Neat Image to remove sensor noise. Then I lightened shadows, darkened highlights, and increased mid-tone contrast by 5 percent. Then I rubbed out the dust spots with the spot healing brush after I used the auto sharpen option in Elements 5. Fixed some minor reflections with the clone stamp tool and saved it as a jpg file. I spent all of two minutes in post processing and the colors "pop".
I might be able to get the same results with the 100mm + tubes + diopter, but it wouldn't look as good nor would it be as sharp...
Check out this review at Juza Nature Photography. I agree with his results, and since I don't mind a little diffraction in my images I shoot with his "in case of emergency" settings (although I normally shoot at F14 from 1x to 2x instead of F16).
If you own a Canon camera and you shoot above life size then you owe it to yourself to check out the MPE-65mm...
Tuesday, July 17, 2007
Using a 70-200 F4 L for closeup photography
Most telephoto lenses are soft at the minimum focusing distance of the lens -by design. The primary use for a telephoto is to take images of distant subjects, so they are built to be sharp when focused toward infinity.
If you're finding it difficult to get sharp images of critters close to the lens then it might not be your technique, it may just be the glass.
One way around the limitation is to use a diopter (like the 500D) since it will fix the focus at about 1/2 of a meter (approximately 18 inches) from the front of the lens. Since the focus is fixed (the focus ring will only change the area of sharp focus by about a centimeter or ½ inch) you can set the focus ring toward infinity and the resulting images are pretty sharp. The focal length of the lens changes the magnification, so to get “closer” to the subject all you have to do is zoom in.
The image with this post was taken with Canon’s 70-200 F4 L and a 500D diopter. Notice how smooth the background is –another advantage to using the diopter is that it improves the bokeh of a lens.
I have a 500D on my 100mm macro lens all the time just for the bokeh…
Monday, July 9, 2007
Diffused MT-24EX results
So, how does the home made diffuser for the MT-24EX perform? I'll let this shot of a butterfly taken at three times life size speak for itself. No FEC and minimal post processing...
Wednesday, July 4, 2007
Home made diffuser
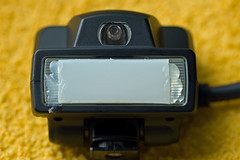
Note 05 May 2009: I am no longer using this method to diffuse my MT-24EX. See my recent blog posts if you want to know what I'm doing to tame the flash. I've left this post intact as way for me to gauge just how much I've learned about flash photography since it was originally written. I would never diffuse my flash this way now -the diffuser is just too small and it's better at blocking the light than at diffusing it...
Disclaimer: Hot gluing plastic to your flash may void the warranty. I am not responsible for any mistakes that you might make...
I know it looks like crap, but it works and I wanted something that didn’t stick out from the flash. I made it by cutting the plastic from a fruit juice bottle and then hot gluing it to the flash heads.
Note to Canon: Pretty sad that a $650 flash doesn’t come with a decent diffuser like the $450 MR-14EX–even the modeling lights on the MR-14EX are better…
A few notes on diffusing a flash: Due to the way that E-TTL metering works there is no need to adjust the exposure. The flash sends out a pre-flash burst that the camera uses for metering, so any diffuser won't make a difference since the camera will compensate for it automatically.
Choose the material for your diffuser carefully. The intensity of a flash is always the same, irregardless of the exposure. But the duration of the flash changes depending on how much light is needed to expose the scene. If your diffuser blocks a lot of light the duration of your flash is going to increase and it's possible that your photos will start to get soft due to motion blur because the flash is "on" long enough for your movements, or the movement of you subject, to become a problem.
Sunday, July 1, 2007
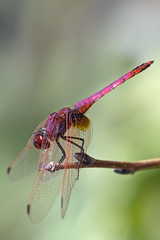
Shooting with an MPE-65mm macro lens
The MPE-65 does not really have a focus ring -it is always focused at maximum magnification. No auto focus either -the focus indicators in the view finder don't work as well. So you have to be good at focusing the scene with nothing to aid you other than the image you see in the view finder. I try to key off of textures like hair, scales, etc. If you are using a standard macro lens now then get use to focusing it without using the focus indicators in the view finder -it will make moving to the MPE-65 a lot easier.
There is a ring on the lens that controls a variable length extension tube, and as you turn it you can go from life size to five times life size and every magnification in between. So you will only be shooting macro with it -not possible to get a shot with a lower magnification than life size.
The advantages: No need to add or subtract anything from the lens -to adjust the magnification you just turn a ring. If you've ever juggled a lens and tubes out in the field you'll understand how easy it is for the MPE to spoil you!
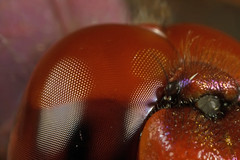
Image quality is on par with "L" glass -I do very little editing and I can get the colors to "pop". As an example I opened the RAW file for this shot of a dragonfly in Elements 5's RAW editor but made no changes, then went into Elements and removed sensor noise, auto adjusted levels, and bumped the highlights by 5%, and removed a few dust spots. Saved the file and uploaded it to Flickr. Total time in post processing was less than two minutes -if it were not for the dust spots I wouldn't even bother shooting RAW...
The downside to every macro lens is the working distance. I wish the MPE had more, but I could say that about every macro lens. It's not about getting close to the critters -I can do that no matter what I'm shooting with. But it's nice to have a lot of room to maneuver when I'm trying to compose a shot. The dragonfly is one of two frames I took at 5x. The working distance is 1.6" from the lens -less if you subtract the MT-24EX macro flash. If you shoot above life size and enjoy it then the MPE-65 is worth the money. But, like me, you'll find yourself wanting a solution for closeup photography...
There is a ring on the lens that controls a variable length extension tube, and as you turn it you can go from life size to five times life size and every magnification in between. So you will only be shooting macro with it -not possible to get a shot with a lower magnification than life size.
The advantages: No need to add or subtract anything from the lens -to adjust the magnification you just turn a ring. If you've ever juggled a lens and tubes out in the field you'll understand how easy it is for the MPE to spoil you!
Image quality is on par with "L" glass -I do very little editing and I can get the colors to "pop". As an example I opened the RAW file for this shot of a dragonfly in Elements 5's RAW editor but made no changes, then went into Elements and removed sensor noise, auto adjusted levels, and bumped the highlights by 5%, and removed a few dust spots. Saved the file and uploaded it to Flickr. Total time in post processing was less than two minutes -if it were not for the dust spots I wouldn't even bother shooting RAW...
The downside to every macro lens is the working distance. I wish the MPE had more, but I could say that about every macro lens. It's not about getting close to the critters -I can do that no matter what I'm shooting with. But it's nice to have a lot of room to maneuver when I'm trying to compose a shot. The dragonfly is one of two frames I took at 5x. The working distance is 1.6" from the lens -less if you subtract the MT-24EX macro flash. If you shoot above life size and enjoy it then the MPE-65 is worth the money. But, like me, you'll find yourself wanting a solution for closeup photography...
Subscribe to:
Posts (Atom)